Mar 25, 2011

Support Alert.....!!! Currency Setup in Dynamics AX 2009 CRM:0027732

<http://www.dynamicsaxtraining.com/knowledge-base-application/currency-setup
-in-dynamics-ax-2009
> Currency Setup in Dynamics AX 2009


To create currency go to General Ledger > Setup > Exchange Rates. The
Exchange rates form opens.


<http://www.dynamicsaxtraining.com/wp-content/uploads/2010/12/Exchange-rates
.png
> Exchange rates form

Exchange rates form

As you can see in above screen shot we have five tabs on this form. First is
the Overview tab. In this tab we'll create new currency. To create new
currency press Ctrl + N, in the Currency field write new currency short name
(3 characters limit), in the Name field write descriptive name for new
currency, in the ISO field select ISO currency code for new currency and in
the Symbol field enter symbol for new currency created.

In the lower pane of the Exchange rates form, are the exchange rates for
currency. You can define exchange rates for each day. If you want to use one
exchange rate leave the Start date field blank. AX will automatically use
last exchange rate, if multiple exchange rates are available.

Next is the General tab which shows same information as in the Overview tab
except the Gender field (Optional if you are not using Spanish check).

Third tab is the Currency convertor tab. Enable currency conversion by check
mark on the Conversion field. Postfix and prefix are character you want to
add before and after amount. Enter spaces before and after postfix and
prefix fields to separate from amount.

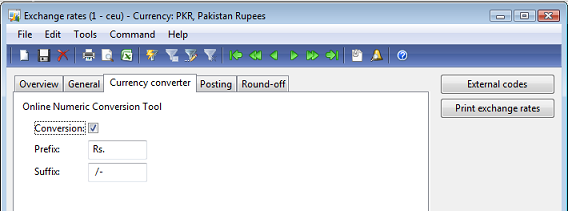
I have created the Pakistan Rupees (PKR) with the following setup:


<http://www.dynamicsaxtraining.com/wp-content/uploads/2010/12/Currency-Excha
nge-form-Currency-conversion5.png
> Exchange rates form, Currency converter
tab

Exchange rates form, Currency converter tab

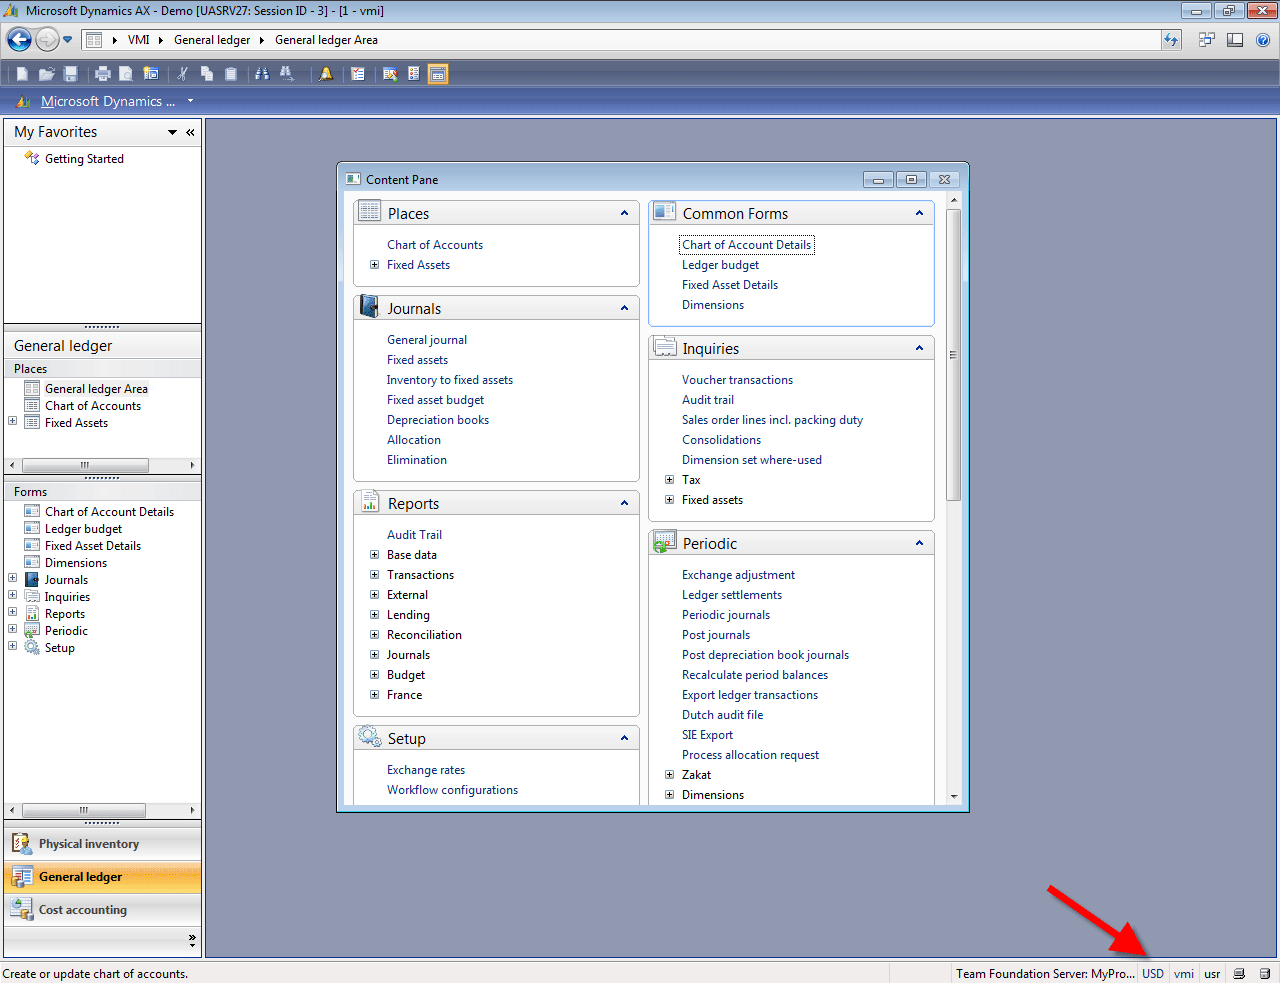
Now I want to view all my amounts in the PRK currency. To do this click the
current currency icon located in the bottom right corner of the status bar.


<http://www.dynamicsaxtraining.com/wp-content/uploads/2010/12/Currency-conve
rter.png
> Currency converter

Currency converter

The Currency converter form opens. Double click on the PKR currency.

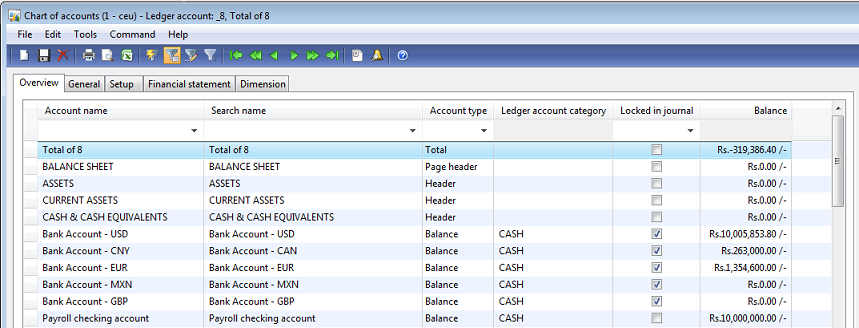
After doing above setting we will get the following result in the Chart of
Accounts form.


<http://www.dynamicsaxtraining.com/wp-content/uploads/2010/12/Postfix-and-Pr
efix-change-in-COA-Detail-form1.png
> Chart of accounts form

Chart of accounts form

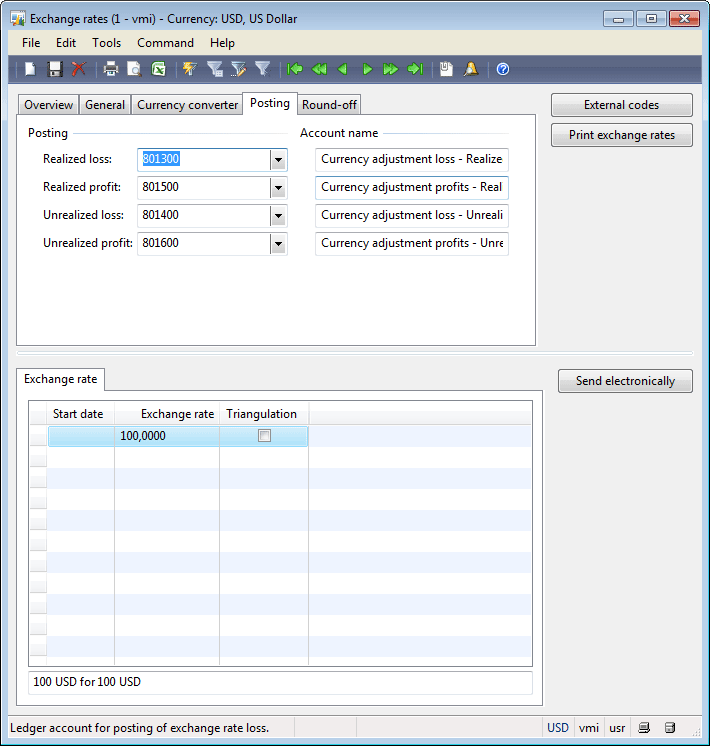
The Posting tab define Realized loss, Realized profit, Unrealized loss,
Unrealized profit general ledger accounts due to currency exchange rate.


<http://www.dynamicsaxtraining.com/wp-content/uploads/2010/12/ExchangeRatesP
ostingTab.png
> Exchange rates form, Posting tab

Exchange rates form, Posting tab

These settings depend on your company policies and weather you are using
foreign currency for billing and payments. There's a detail article about
Realized and Unrealized profit and loss
<http://www.dynamicsaxtraining.com/knowledge-base-application/realized-loss-
realized-profit-unrealized-loss-unrealized-profit-in-dynamics-ax-2009
> .

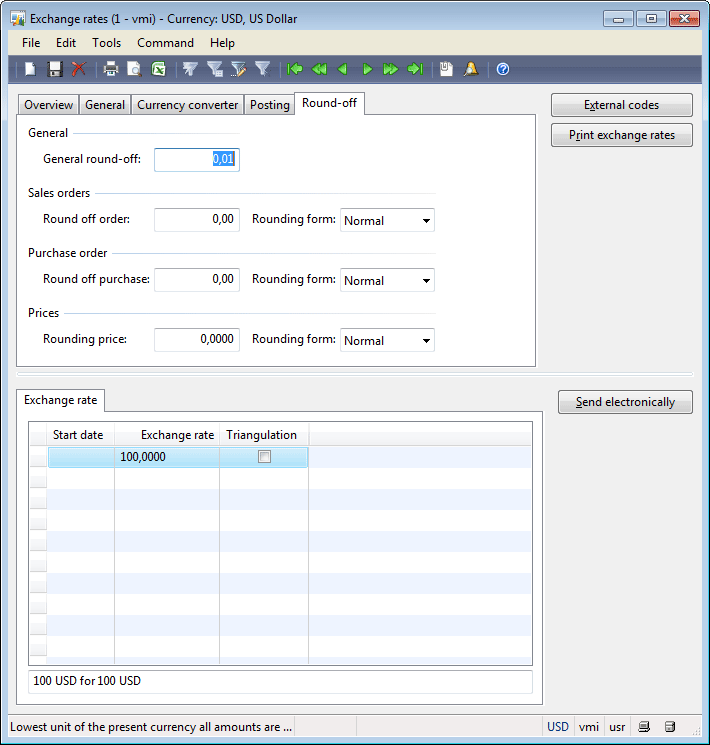
Last tab is the Round-off tab as the name shows it's about rounding off
currency.


<http://www.dynamicsaxtraining.com/wp-content/uploads/2010/12/ExchangeRatesR
oundOffTab.png
> Exchange rates form, Round-off tab

Exchange rates form, Round-off tab

General rounding-off applies to all modules and there are separate settings
for Account Receivable, Account Payables modules and Prices.

Example: We have amount 6827.28. Below table describe how Round Off and
Rounding form works.


Rounding form

Round off .01

Round off .10

Round off 1.00

Round off 10.00

Round off 100.00


Normal

6827.28

6827.20

6827.00

6830.00

6800.00


Upward

6827.28

6827.30

6828.00

6830.00

6800.00


Downward

6827.28

6827.20

6827.00

6820.00

6800.00


Currency setup in General Ledger module


In General Ledger module go to Setup > Parameters. The General ledger
parameters form opens. Go to the Ledger tab:


<http://www.dynamicsaxtraining.com/wp-content/uploads/2010/12/GeneralLedgerP
arameters.png
> General ledger parameters form

General ledger parameters form

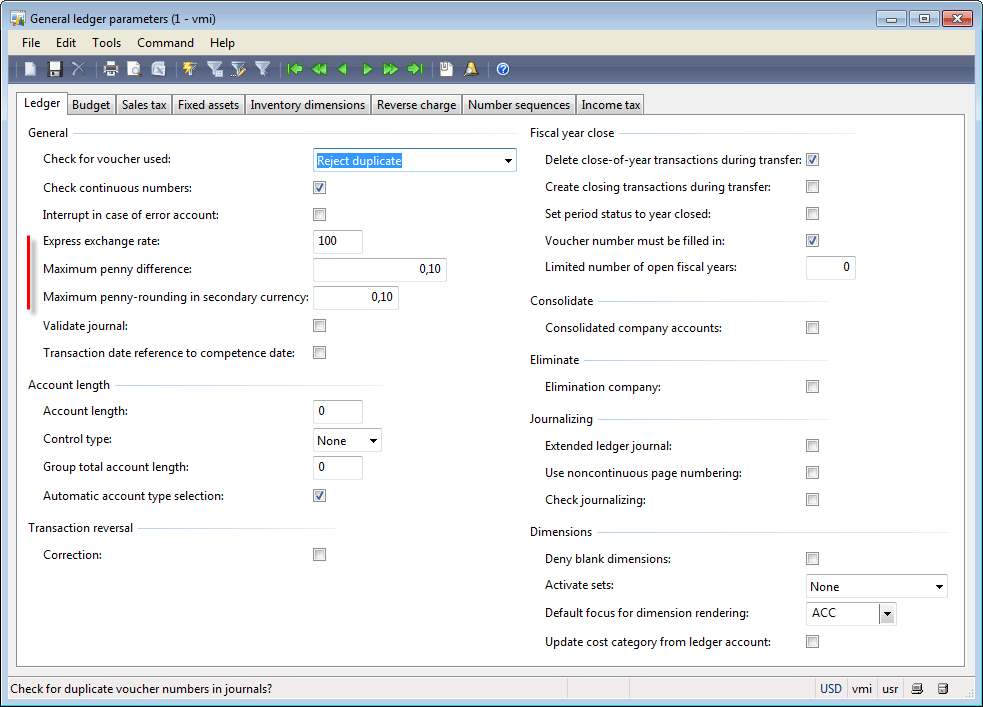
In the Express exchange rate field specify how much of your currency equals
to 100 units of foreign currency. The value is used in the Exchange rates
form.

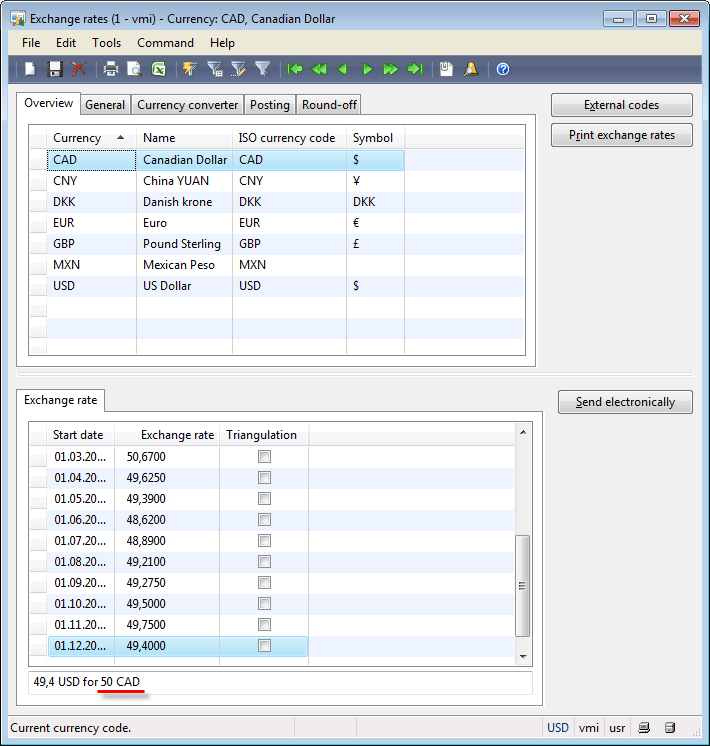
Example: Enter the 50 in the Express exchange rate field. Save parameters.
The Exchange rates form will have the following values.


<http://www.dynamicsaxtraining.com/wp-content/uploads/2010/12/ExchangeRatesN
um.png
> Exchange rates form

Exchange rates form

The Maximum penny difference field contains the maximum difference between
debit and credit amount in the voucher. The difference can appear when debit
or credit amount is rounded (because debit and credit amount is rounded
separately).

The Maximum penny-rounding in the secondary currency field contains the
maximum difference between debit and credit amount in the voucher if this
amount is recorded in the secondary currency.


Setting up company default currency


To set company default currency do the following:

Go to the Basic > Setup > Company information > Other tab > Currency field
group > Currency field

You can select any currency you have created in the Exchange rates form

Mar 24, 2011

Support Alert.....!!! Core Concepts in Production (AXAPTA) CRM:0027731

Introduction (Core Concepts in Production)


Why does the company need to have the Production module? …The answer is for
managing and accounting the Production. What is Production? Production is a
process of creating products. And, what is a product?

From Wikipedia <http://en.wikipedia.org/wiki/Product_%28business%29> :

"The noun product is defined as a "thing produced by labor or effort" or the
"result of an act or a process", and stems from the verb produce, from the
Latin prōdūce(re) '(to) lead or bring forth'."

So the Production module is used for the following purposes:

* Setting up materials (product structure) and resources (operations)
required for a product creation.
* Accounting the product production process (accounting materials and
resources required for producing a product).

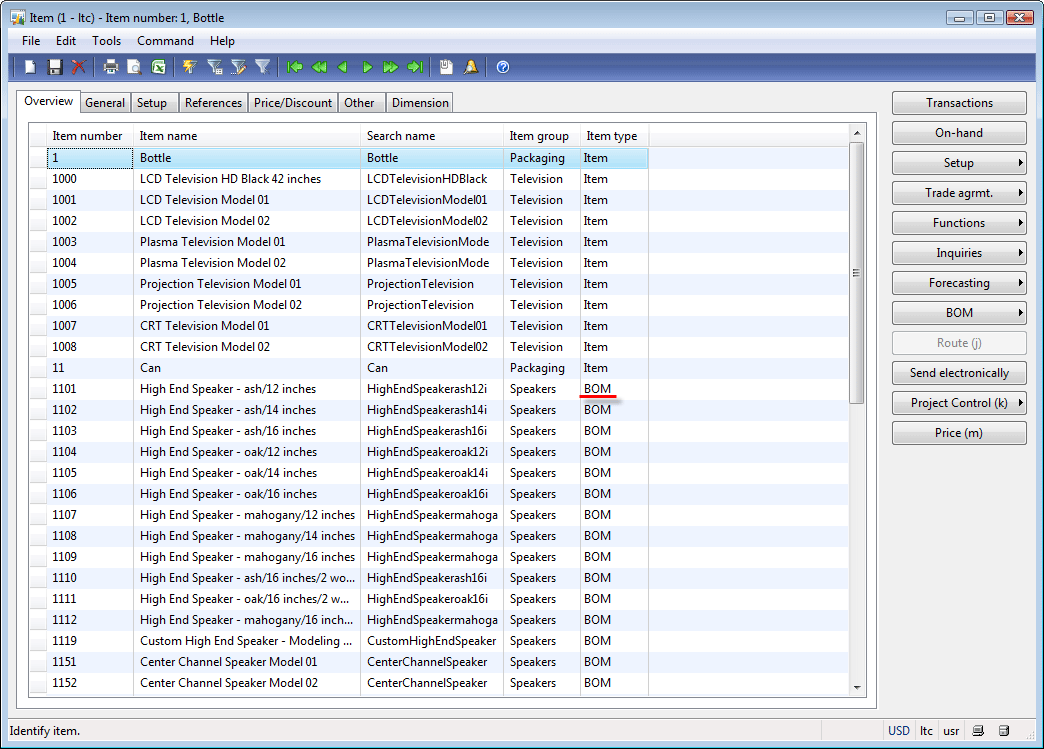
In Microsoft Dynamics AX 2009, a product is an item of the BOM item type
(BOM – Bill of materials). Go to Inventory management > Common Forms > Item
details.

<http://www.dynamicsaxtraining.com/wp-content/uploads/2010/06/Product.png>
Product

Product


Setting Up Materials Required for Product Creation (Product Structure)


Product structure contains the information about the materials that are
required for building the product.

Item of the BOM item type (product) must be associated with the Bills of
Materials.

From Wikipedia <http://en.wikipedia.org/wiki/Bill_of_materials> :

"The bill of materials (BOM) is a list of the raw materials, sub-assemblies,
intermediate assemblies, sub-components, components, parts and the
quantities of each needed to manufacture an end product".

To view the BOM associated with the item, in the Item form, select necessary
item and click the BOM > Lines menu button.

<http://www.dynamicsaxtraining.com/wp-content/uploads/2010/06/BOMLines.png>
BOM Line form

BOM Line form

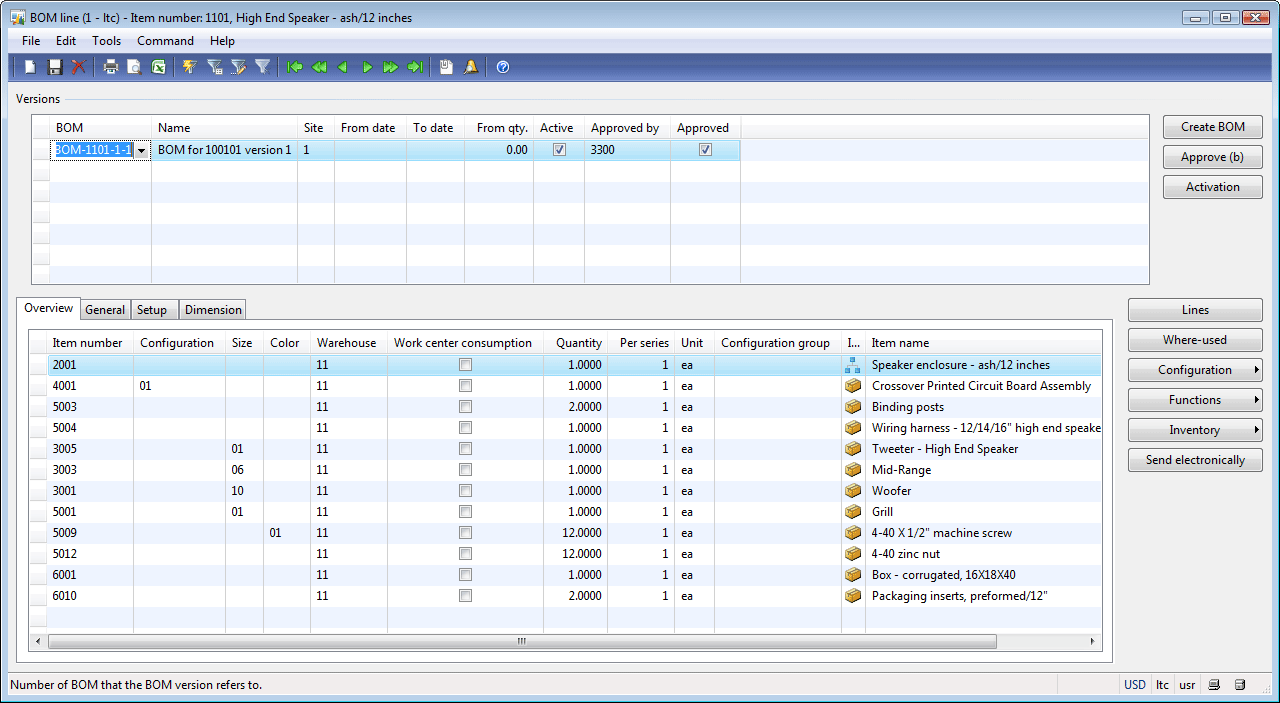
In our demo data, the 1101 item is associated with the BOM-1101-1-1 BOM. In
the BOM line form, we can see the components that are used in order to
produce the 1101 item.


Setting Up Resources Required for the Product Creation (Operations)


An operation contains information about the resources that are required for
building the product.

An item of the BOM item type must be associated with the Route. A Route
defines operations and their sequence required for producing the product.
The operation contains information about the working time and the required
resources. So, we can say that:

* BOM contains information about the materials required for building
the product.
* Route contains information about the working time and the resources
required for building the product.

Resources are presented in Microsoft Dynamics AX as work centers. In
Microsoft Dynamics AX 2009, a work center can be of the following types:

* Machine
* Tool
* Human
* Operator
* Vendor

To view the Route associated with the item, click the Route button in the
Item form.

<http://www.dynamicsaxtraining.com/wp-content/uploads/2010/06/Route.png>
Route form

Route form

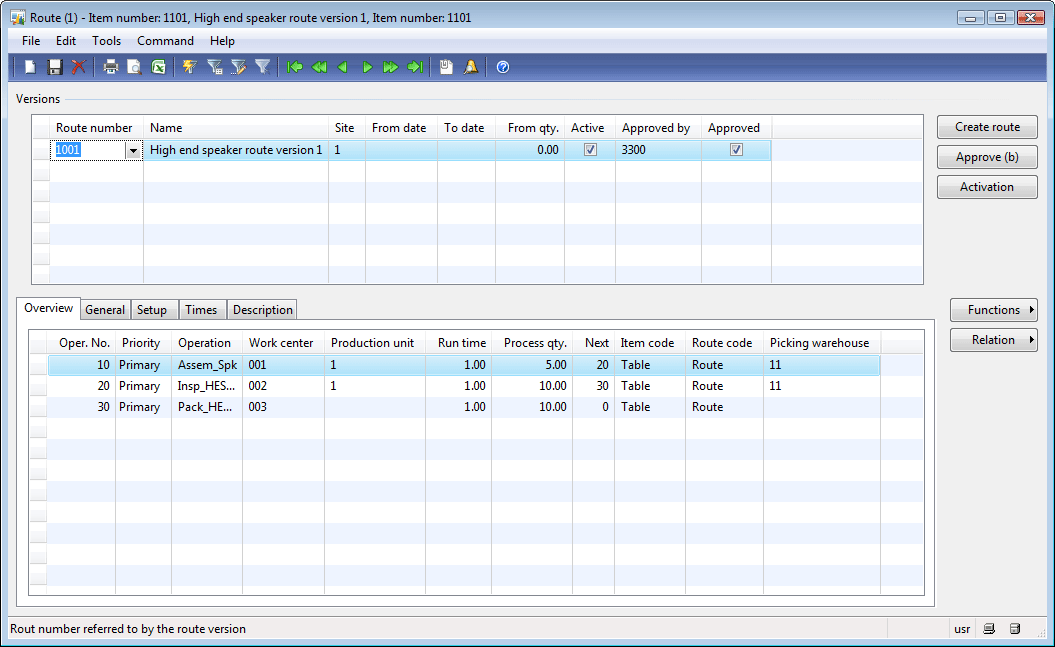
In our demo data, the 1101 item is associated with the 1001 Route. In the
Route form, we can see the operations (work centers, working time) that are
used for producing the 1101 item. We will learn how to understand the
information presented in the Route form in the next lesson.

How are the operations and the materials connected?

Each material is manually associated with a specific operation.

1. In the Item form, click the BOM > BOM lines menu button.
2. Go to the General tab and enter the necessary operation in the Oper.
No. field.

With the help of the BOM designer, do the following:

1. In the Item form, click the BOM > Designer menu item.
2. Drag and drop product materials to a specific operation.


<http://www.dynamicsaxtraining.com/wp-content/uploads/2010/06/BOMDesigner.pn
g
> BOM designer form

BOM designer form


Accounting Product Production Process (accounting materials and resources
required for production of a product)


A production order is used for managing the product creation process. It can
be created from a sales order.

The production order follows a sequential "production life cycle". The life
cycle reflects the actual steps that are taken to manufacture an item. It
begins with the creation of a production order and ends with a finished,
manufactured item that is ready for the customer. Each step in the life
cycle requires different kinds of information.

When the production order is ended, items that will be consumed are deducted
from the inventory, the created product is added to the inventory and the
costs of materials and resources are recorded to the general ledger
accounts.


summary:


1. Production module is use for:

* Setting up materials (product structure) and resources (operations)
required for creating a product
* Accounting product production process (accounting materials and
resources required for producing a product)

2. Product is an Item of the BOM item type.
3. Product is associated with a BOM and a Route.

* Bills of Material – BOMS
A Bill of Material or a BOM defines the recipe for making a product. Think
of it as a list of ingredients which includes all the sub-assemblies,
components, and raw materials required for making a single finished product.

* Routes and Operations
A production route defines the process which is used for making a finished
product. Sequential steps, or operations, are created which describe the
Work Centres involved in the production process and how much time it takes
to carry out each operation.
* Work Centres
Work Centres represent production resources available to a company for
making products. In Microsoft Dynamics AX 2009, a Work Centre can be a
Machine, a Tool, a Human Operator, or a Vendor.

4. A Production order is used for managing the product creation
process.

Support Alert.....!!! Core Concepts in Production (AXAPTA) CRM:0027731

Introduction (Core Concepts in Production)


Why does the company need to have the Production module? …The answer is for
managing and accounting the Production. What is Production? Production is a
process of creating products. And, what is a product?

From Wikipedia <http://en.wikipedia.org/wiki/Product_%28business%29> :

"The noun product is defined as a "thing produced by labor or effort" or the
"result of an act or a process", and stems from the verb produce, from the
Latin prōdūce(re) '(to) lead or bring forth'."

So the Production module is used for the following purposes:

* Setting up materials (product structure) and resources (operations)
required for a product creation.
* Accounting the product production process (accounting materials and
resources required for producing a product).

In Microsoft Dynamics AX 2009, a product is an item of the BOM item type
(BOM – Bill of materials). Go to Inventory management > Common Forms > Item
details.

<http://www.dynamicsaxtraining.com/wp-content/uploads/2010/06/Product.png>
Product

Product


Setting Up Materials Required for Product Creation (Product Structure)


Product structure contains the information about the materials that are
required for building the product.

Item of the BOM item type (product) must be associated with the Bills of
Materials.

From Wikipedia <http://en.wikipedia.org/wiki/Bill_of_materials> :

"The bill of materials (BOM) is a list of the raw materials, sub-assemblies,
intermediate assemblies, sub-components, components, parts and the
quantities of each needed to manufacture an end product".

To view the BOM associated with the item, in the Item form, select necessary
item and click the BOM > Lines menu button.

<http://www.dynamicsaxtraining.com/wp-content/uploads/2010/06/BOMLines.png>
BOM Line form

BOM Line form

In our demo data, the 1101 item is associated with the BOM-1101-1-1 BOM. In
the BOM line form, we can see the components that are used in order to
produce the 1101 item.


Setting Up Resources Required for the Product Creation (Operations)


An operation contains information about the resources that are required for
building the product.

An item of the BOM item type must be associated with the Route. A Route
defines operations and their sequence required for producing the product.
The operation contains information about the working time and the required
resources. So, we can say that:

* BOM contains information about the materials required for building
the product.
* Route contains information about the working time and the resources
required for building the product.

Resources are presented in Microsoft Dynamics AX as work centers. In
Microsoft Dynamics AX 2009, a work center can be of the following types:

* Machine
* Tool
* Human
* Operator
* Vendor

To view the Route associated with the item, click the Route button in the
Item form.

<http://www.dynamicsaxtraining.com/wp-content/uploads/2010/06/Route.png>
Route form

Route form

In our demo data, the 1101 item is associated with the 1001 Route. In the
Route form, we can see the operations (work centers, working time) that are
used for producing the 1101 item. We will learn how to understand the
information presented in the Route form in the next lesson.

How are the operations and the materials connected?

Each material is manually associated with a specific operation.

1. In the Item form, click the BOM > BOM lines menu button.
2. Go to the General tab and enter the necessary operation in the Oper.
No. field.

With the help of the BOM designer, do the following:

1. In the Item form, click the BOM > Designer menu item.
2. Drag and drop product materials to a specific operation.


<http://www.dynamicsaxtraining.com/wp-content/uploads/2010/06/BOMDesigner.pn
g
> BOM designer form

BOM designer form


Accounting Product Production Process (accounting materials and resources
required for production of a product)


A production order is used for managing the product creation process. It can
be created from a sales order.

The production order follows a sequential "production life cycle". The life
cycle reflects the actual steps that are taken to manufacture an item. It
begins with the creation of a production order and ends with a finished,
manufactured item that is ready for the customer. Each step in the life
cycle requires different kinds of information.

When the production order is ended, items that will be consumed are deducted
from the inventory, the created product is added to the inventory and the
costs of materials and resources are recorded to the general ledger
accounts.


summary:


1. Production module is use for:

* Setting up materials (product structure) and resources (operations)
required for creating a product
* Accounting product production process (accounting materials and
resources required for producing a product)

2. Product is an Item of the BOM item type.
3. Product is associated with a BOM and a Route.

* Bills of Material – BOMS
A Bill of Material or a BOM defines the recipe for making a product. Think
of it as a list of ingredients which includes all the sub-assemblies,
components, and raw materials required for making a single finished product.

* Routes and Operations
A production route defines the process which is used for making a finished
product. Sequential steps, or operations, are created which describe the
Work Centres involved in the production process and how much time it takes
to carry out each operation.
* Work Centres
Work Centres represent production resources available to a company for
making products. In Microsoft Dynamics AX 2009, a Work Centre can be a
Machine, a Tool, a Human Operator, or a Vendor.

4. A Production order is used for managing the product creation
process.

Mar 21, 2011

Quote (Test)

To start mail merge, click CRM.


In Microsoft Office Word 2007, the CRM button appears on either the Add-ins tab or the Mailings tab, depending on the mail merge template you selected.


After you click CRM, the macro creates a new text file and puts the comment data into it. The comment is the data source for your mail merge.[CRM1] 


Caution: To run mail merge, you must enable macros for this document. After the mail merge is completed, delete this file and the associated text file to safeguard possibly sensitive data.


<TABLE><TH>Bill_To_City</TH><TH>Bill_To_Country_Region</TH><TH>Bill_To_Fax</TH><TH>Bill_To_Street_1</TH><TH>Bill_To_Street_2</TH><TH>Bill_To_Street_3</TH><TH>Bill_To_ZIP_Postal_Code</TH><TH>Bill_To_State_Province</TH><TH>Bill_To_Phone</TH><TH>Potential_Customer</TH><TH>Description</TH><TH>Quote_Discount_Amount</TH><TH>Quote_Discount_</TH><TH>Effective_From</TH><TH>Effective_To</TH><TH>Due_By</TH><TH>Freight_Amount</TH><TH>Freight_Terms</TH><TH>Name</TH><TH>Opportunity</TH><TH>Owner</TH><TH>Payment_Terms</TH><TH>Price_List</TH><TH>Quote_ID</TH><TH>Requested_Delivery_Date</TH><TH>Revision_ID</TH><TH>Shipping_Method</TH><TH>Ship_To_City</TH><TH>Ship_To_Country_Region</TH><TH>Ship_To_Fax</TH><TH>Ship_To_Street_1</TH><TH>Ship_To_Street_2</TH><TH>Ship_To_Street_3</TH><TH>Ship_To_ZIP_Postal_Code</TH><TH>Ship_To_State_Province</TH><TH>Ship_To_Phone</TH><TH>Total_Amount</TH><TH>Total_Pre_Freight_Amount</TH><TH>Total_Detail_Amount</TH><TH>Total_Tax</TH><TH>Product_ID</TH><TH>Quote_Product_Ship_To_Street_1</TH><TH>Quote_Product_Ship_To_Street_2</TH><TH>Quote_Product_Ship_To_Street_3</TH><TH>Quote_Product_Ship_To_City</TH><TH>Quote_Product_Ship_To_State_Province</TH><TH>Quote_Product_Ship_To_Country_Region</TH><TH>Quote_Product_Ship_To_ZIP_Postal_Code</TH><TH>Quote_Product_Ship_To_Phone</TH><TH>Quote_Product_Ship_To_Fax</TH><TH>Quote_Product_Product</TH><TH>Quote_Product_Volume_Discount</TH><TH>Quote_Product_Price_Per_Unit</TH><TH>Quote_Product_Quantity</TH><TH>Quote_Product_Amount</TH><TH>Quote_Product_Manual_Discount</TH><TH>Quote_Product_Extended_Amount</TH><TH>Quote_Product_Requested_Delivery_Date</TH><TH>Quote_Product_Unit</TH><TH>Quote_Product_Product_Description</TH><TH>Quote_Product_Salesperson</TH><TH>Quote_Product_Tax</TH><TH>LastItem</TH><TR><TD /><TD /><TD /><TD /><TD /><TD /><TD /><TD /><TD /><TD>*Sample</TD><TD /><TD /><TD /><TD /><TD /><TD /><TD /><TD /><TD>*sample</TD><TD>*sample</TD><TD>{D7BF5328-D123-DF11-AA31-001372F920BA}</TD><TD /><TD>UAE</TD><TD>QUO-01001-NBF5LW</TD><TD /><TD>0</TD><TD /><TD /><TD /><TD /><TD /><TD /><TD /><TD /><TD /><TD /><TD>$2,744.00</TD><TD>$2,744.00</TD><TD>$2,744.00</TD><TD>$0.00</TD><TD>F001</TD><TD /><TD /><TD /><TD /><TD /><TD /><TD /><TD /><TD /><TD>FISH! Culture v2 FILM</TD><TD>$0.00</TD><TD>$999.00</TD><TD>1.00000</TD><TD>$999.00</TD><TD /><TD>$999.00</TD><TD /><TD>No</TD><TD /><TD>Ahmad Hussain</TD><TD /><TD>0</TD></TR><TR><TD /><TD /><TD /><TD /><TD /><TD /><TD /><TD /><TD /><TD>*Sample</TD><TD /><TD /><TD /><TD /><TD /><TD /><TD /><TD /><TD>*sample</TD><TD>*sample</TD><TD>{D7BF5328-D123-DF11-AA31-001372F920BA}</TD><TD /><TD>UAE</TD><TD>QUO-01001-NBF5LW</TD><TD /><TD>0</TD><TD /><TD /><TD /><TD /><TD /><TD /><TD /><TD /><TD /><TD /><TD>$2,744.00</TD><TD>$2,744.00</TD><TD>$2,744.00</TD><TD>$0.00</TD><TD>F002</TD><TD /><TD /><TD /><TD /><TD /><TD /><TD /><TD /><TD /><TD>FISH! Complete, Pack</TD><TD>$0.00</TD><TD>$920.00</TD><TD>1.00000</TD><TD>$920.00</TD><TD /><TD>$920.00</TD><TD /><TD>No</TD><TD /><TD>Ahmad Hussain</TD><TD /><TD>0</TD></TR><TR><TD /><TD /><TD /><TD /><TD /><TD /><TD /><TD /><TD /><TD>*Sample</TD><TD /><TD /><TD /><TD /><TD /><TD /><TD /><TD /><TD>*sample</TD><TD>*sample</TD><TD>{D7BF5328-D123-DF11-AA31-001372F920BA}</TD><TD /><TD>UAE</TD><TD>QUO-01001-NBF5LW</TD><TD /><TD>0</TD><TD /><TD /><TD /><TD /><TD /><TD /><TD /><TD /><TD /><TD /><TD>$2,744.00</TD><TD>$2,744.00</TD><TD>$2,744.00</TD><TD>$0.00</TD><TD>F003</TD><TD /><TD /><TD /><TD /><TD /><TD /><TD /><TD /><TD /><TD>FISH! Sticks</TD><TD>$0.00</TD><TD>$825.00</TD><TD>1.00000</TD><TD>$825.00</TD><TD /><TD>$825.00</TD><TD /><TD>No</TD><TD /><TD>Ahmad Hussain</TD><TD /><TD>1</TD></TR></TABLE>

Feb 15, 2011

Credit Card Processor in Dynamics AX 2009 CRM:0027658

Credit Card Processor in Dynamics AX 2009

This post introduces the Credit Card processor functionality that is
available in Microsoft Dynamics AX 2009. There are two processors available
to users: Microsoft Dynamics Payment Services and Authorize.net. Depending
on your preference you can select which processor you want to process
payments, however only one can be active at a time. For this blog, we will
use Authorize.net. Continue reading for more information.

http://www.dynamicscare.com/blog/wp-content/uploads/2011/02/cc1.png

Basic Credit Card Process is below; It follows preauthorization of a Credit
Card as well.

Step 1. Click Area Page node: Accounts receivable -> Sales Order Details.

Form name: Sales orders

http://www.dynamicscare.com/blog/wp-content/uploads/2011/02/cc2.png

・ Create a new record in the Sales Order form clicking the 'New'
button.

Form name: Create sales order

http://www.dynamicscare.com/blog/wp-content/uploads/2011/02/cc3.png

Step 2. Fill in the necessary information to complete the Sales Order entry.


Step 3: The Sales order number is automatically generated

・ Ex: 'SO-00053177′

Step 4: Switch to the Lines tab on the Sales order and enter in Item
information.

http://www.dynamicscare.com/blog/wp-content/uploads/2011/02/cc4.png

Step 5: Switch to the Price/Discount tab on the Sales order.

Form name: Infolog

http://www.dynamicscare.com/blog/wp-content/uploads/2011/02/cc5.png

・ Click the Close button.

Make sure that the method of payment is set to Credit Card.

http://www.dynamicscare.com/blog/wp-content/uploads/2011/02/cc6.png

IF no credit card is on file or they want to charge a different card then
the Credit Card Wizard must be used to setup the Credit Card every time.
Follow the steps below to use the CC Wizard, otherwise skip to step 7 after
selecting the Credit Card to use.

Step 6: Click the Setup -> Credit Card Wizard menu button.

Form name: Credit Card Setup Wizard

http://www.dynamicscare.com/blog/wp-content/uploads/2011/02/cc7.png

・ Click the Next > button.

・ Switch to the Credit Card Wizard Action tab on the Credit Card Setup
Wizard form.

http://www.dynamicscare.com/blog/wp-content/uploads/2011/02/cc8.png

・ Click the Next > button.

・ Switch to the Credit card type tab on the Credit Card Setup Wizard
form.

http://www.dynamicscare.com/blog/wp-content/uploads/2011/02/cc9.png

・ Click the Next > button.

・ Switch to the Card holder tab on the Credit Card Setup Wizard form.

http://www.dynamicscare.com/blog/wp-content/uploads/2011/02/cc10.png

・ Change Card Holder Name

・ Click the Next > button.

・ Switch to the Contact information tab on the Credit Card Setup
Wizard form.

http://www.dynamicscare.com/blog/wp-content/uploads/2011/02/cc11.png

・ Input the necessary information into the fields.

・ Click the Next > button.

・ Switch to the Credit card number tab on the Credit Card Setup Wizard
form.

http://www.dynamicscare.com/blog/wp-content/uploads/2011/02/cc12.png

・ Input the credit card number and expiration date and click next to
finish the wizard.

Step 7: Click the Functions (b) -> Preauthorize menu button off of the Sales
Order header.

Form name: Infolog

http://www.dynamicscare.com/blog/wp-content/uploads/2011/02/cc131.png

・ The infolog tells you whether the transaction was successful for
not.

・ Click the Close button and continue if successful.

If unsuccessful, the infolog log will give a reason. Most likely, the Credit
Card was not setup correctly. Go back through the Credit Card wizard using
the Edit feature and verify all of the information. Try to preauthorize
again.

When you invoice the Sales Order the final authorization is sent through the
processor and the credit card is charged and settled with that amount on the
invoice.

Other Functionality with the Credit Card processor:

Credit Card Transaction History:

・ Click the Inquiries -> Credit card authorization history menu
button.

Form name: Credit card authorization history

http://www.dynamicscare.com/blog/wp-content/uploads/2011/02/cc14.png

・ Close the Credit card authorization history form.

----------------------------------------------------------------------------
----------------------------------------------------------------------------
---------------------------------------------

Faiqa Usman, Support Manager,

Feb 4, 2011

Support Alert......!!!! Role Centers: Right on Cue CRM:0027633

Role Centers: Right on Cue

AX 2009 ships with a variety of preloaded cues that typically correspond to
a form in the application. You can view these cues in the Basic module
(Setup>Role Center>Edit Cues).

http://www.dynamicscare.com/blog/wp-content/uploads/2011/01/editcues.png

In this form, you can review all the existing cues and, once you create your
own cues, you can edit cues if they are showing you exactly what you're
looking for. To create your own cue, open a form, apply a filter, and then
save the filter as a cue. As an example, we'll create a cue for planned
purchase orders from vendor 2102. To do this, we'll open the planned
purchase order form and click on the advanced filter button (which looks
like a funnel and pencil).

http://www.dynamicscare.com/blog/wp-content/uploads/2011/01/advancedfilter.p
ng

Enter your filter criteria and then click on the Modify button and select
Save as Cue.

http://www.dynamicscare.com/blog/wp-content/uploads/2011/01/saveascue.png

You'll then be asked to enter a Cue ID and a Caption. The Cue ID is
character limited but you can enter a more informative title to the Caption.
You'll want to use ID's and caption that you can easily recognize later. You
will also enter some other information on the Save as Cue form, including
the cue's count, it's threshold, it's total, and it's security level. The
count, threshold, and total are tools that can be used to create a more KPI
feeling to the cue. The security is important to note if you plan on sharing
the cue across users or if it will be just for personal use. This a big
advantage of Cues over saved filters; saved filters can't be shared across
users. Once the cue is saved, head back to your Role Center home page. If
you already have Cues on your Role Center, click the down arrow next to
their title and select edit web part. If you need to add the Web Part,
select Personalize this Page and add the Web Part.

http://www.dynamicscare.com/blog/wp-content/uploads/2011/01/addcues.png

When editing the Cues Web Part, you have to select the Cue you are
modifying. If you want to modify a Cue already in the Web Part, select if
from the list. If it's a new Cue, select the Cue after the number of Cues
already in the Web Part. In the View drop down, select the Cue we just
saved; it will be listed under the Caption we gave the Cue earlier. Again,
you can edit the count, threshold, and total of the Web Part. The threshold
can add an indicator to the cue if it violates the threshold. The total can
also be used to display information about the items in the cue.

http://www.dynamicscare.com/blog/wp-content/uploads/2011/01/cuesettings.png


Once you click ok, you'll notice that the cue has been added.


http://www.dynamicscare.com/blog/wp-content/uploads/2011/01/plannedpocue.png


That does it for adding cues to your Role Center. It's really simple and its
simplicity makes it a very powerful tool in Microsoft Dynamics AX 2009.

Update: I wanted to add a quick note that not only can Cues be shared across
users but they can also exported and imported to other application instances
(pretty handy if you create a complicated cue in a test environment and you
want to move it to live). To do this, export the cue to the AOT by selecting
the Export to AOT option from the Export button on the Edit Cues form. This
will add the Cue to the Resource node.

----------------------------------------------------------------------------
----------------------------------------------------------------------------
---------------------------------------------

Faiqa Usman, Support Manager

Jan 28, 2011

Support Alert......!!!! Aging Buckets in Microsoft Dynamics AX 2009 CRM:0027618

Aging Buckets in Microsoft Dynamics AX 2009

This article will explore the aging bucket functionality within Dynamics AX
2009 and how to use them in reporting. Aging buckets can be used in Accounts
Receivable and Accounts Payable for Customer Aging or Vendor Aging. You do
not necessarily need to have aging buckets setup to run the Aging reports,
but it does make the functionality more available in other modules. Keep
reading to see how to setup basic 30-60-90 Aging Buckets.

Follow these Steps to create the most basic Aging Buckets for reporting:

Accounts Receivable > Setup > Statistics > Aging Buckets

Click Create New, and enter an aging bucket name and description.

http://www.dynamicscare.com/blog/wp-content/uploads/2010/12/aging1.png

Click the Specification tab and delete the row that is created automatically
with the red "X" button on the toolbar.

* Create two new rows before entering in any data.

* In the Top Row enter a name in the Header column, 0 (zero) in the Unit
column, and select Day in the Interval column. This line must be created
for all aging buckets (AP and AR), and both modules share the same table, so
you will see all aging bucket regardless of which module you are working in.
Make sure that the printing direction is set to forward.

* In the bottom row enter in Future for the header, 900 for the unit, and
Unlimited in the interval field.

http://www.dynamicscare.com/blog/wp-content/uploads/2010/12/aging2.png

Once the base line is set, create the additional lines you would like to
display on the Customer Aging Report. There are a maximum number of 6 lines
that may be posted, and the Unit column designates the number of units
between each column.

http://www.dynamicscare.com/blog/wp-content/uploads/2010/12/aging3.png

The user can use the Up and Down buttons to move each line to a desired
position on the report. Once the buckets are set to the user
specifications, click the Save button and close the window.

Running a Customer Aging Report

Accounts Receivable > Reports > Status > Customer Aging Report

To use the desired aging bucket, use the drop down arrow in the Aging
buckets field to select an aging bucket. If the user selects Yes in the
Print aging bucket description, then the text in the aging bucket header
column will be displayed at the top of each column on the report. Leave the
checkbox for "Payment Positioning" unchecked.

http://www.dynamicscare.com/blog/wp-content/uploads/2010/12/aging4.png

Aging Report

http://www.dynamicscare.com/blog/wp-content/uploads/2010/12/aging5.png

----------------------------------------------------------------------------
----------------------------------------------------------------------------
---------------------------------------------

Faiqa Usman, Support Manager,

Jan 12, 2011

Registering Assembly in CRM

1- Download Plugin Registration Tool and click Plugin Registration.exe

2- In Connection Information write label anything specific to project name like test project or project name, discovery server is    

    the server where your CRM web service is configured, local host if you are using Plugin Registration tool on same server if it on  

    is different server then you have to write IP address or server name.

3- Port will be 5555 and then domain name and username. Username should have system administrator and system customizer  

    rights in CRM otherwise it will give you privileges exception and then click on connect.

clip_image002

4- Write password for username.

clip_image004

5- testKASB connection is showing and under this connection we have two organizations with the name KASB and test. Your

    organization will show here click on organization and then click on connect.

clip_image006

6- Registered Plugins and Custom Workflow activities area showing registered assemblies.

clip_image008

7- For registering new assembly click on Register and then Register New Assembly.

clip_image010

8- In step #1 browse the assembly or dll file.

9- In step #2 checkboxes will be by default selected.

10- In step #3 select database and then click on registered selected plugin.

clip_image012

11- Plugin is registered successfully.

clip_image014

12- Your assembly will be showing in Registered Plugins and Custom Workflow Activities.

clip_image016

Step Registration

13- Now register a step in an assembly.

14- Click on your assembly.

15- Click on Register and then Register New Step.

clip_image018

16- We are using Create in Message. This plugin will execute on creation of primary entity.

17- Select Primary Entity.

18- Select none if you don’t have any Secondary Entity.

19- You can select attributes by Filtering Attributes.

20- Plugin will be by default selected.

21- Description for plugin.

22- Select user in Run in User’s Context.

23- Execution Order will be 1.

24- Configured Eventing Pipeline Stage of Execution, Execution Mode, Step Deployment and Triggering Pipeline as per your requirement and then click on Register New Step.

clip_image020

25- Your step will be showing under your assembly.

Nov 23, 2010

Why the Fiscal Year Close in Microsoft Dynamics AX 2009 Is So Important, and How to Get It Right

When a company finalizes its accounts for a particular year using Microsoft Dynamics AX and doesn't want to make any further changes in that year, it can then close that year by using 'Fiscal Year Close'.
At that point, the records of that year will be available only for view. No more changes are possible in that year. If you have filed your returns for any particular year and don't need to make any changes, you can close that year.
You can close individual years only serially. i.e., the record of the first financial year will be closed first and then the next. You can't close a recent year if any of the previous years is not closed.
But, not surprisingly, it's all more complicated than that. Here are suggestions to close the previous fiscal year and prepare for the new one:
Pre-Requisites
1. Complete month-end and other period closings in all modules other than General ledger.
2. Reconcile the modules and the ledger.
3. Print the Trial balance, Account statement, Financial statement, and required reconciliation reports.
4. Set appropriate periods to Stopped for the current...[Read Full article Click Here]