Sep 30, 2010

Support Alert......!!!! Sales Force Segmentation in AX2009 CRM:0027486

Sales Force Segmentation in AX2009

There are a few ways to slice and dice your sales personnel in Dynamics AX.
Some are in the CRM module and some are in the AR module.

The Sales Unit: In order to report sales by department, team or individual,
you must group sales personnel into sales units. Units can be defined by an
area of responsibility such as geographical area, customer size, and
customer type. From this form you can create a team or unit, staff it and
assign managers, and assign activities. Sales targets are set by Sales
units and Sales unit members.
CRM > Setup > Sales management > Sales unit/team

The Sales Group: Also known as the Sales Commission group, this is where you
assign employees to the "commission groups" that have employee and
commissions set to them. First you set up the group, then assign employees
and their share of commissions.
AR > Setup > Commission > Sales group
<http://www.dynamicscare.com/blog/wp-content/uploads/2010/03/Capture2.JPG>
Capture2
On question I get from clients is "Can I assign a sales person to a
customer?". Well yes and no. You can assign a Sales group to a customer
(NOTE! This is actually the Sales Commission Group). Since the sales group
is tied to employees, then you are in effect tying employees to a customer.
If you need to tie one employee to a customer, then create a one employee
team with 100% of the distribution. It is important to note that both the
Sales group and the Sales unit can both be designated on the sales order
form.

----------------------------------------------------------------------------
----------------------------------------------------------------------------
---------------------------------------------

Faiqa Usman, Support Manager,

Sep 29, 2010

FW: Support Alert......!!!! Print Management in AX2009

Print Management

Print Management is a useful tool that allows the user to define settings to
produce original records, copy records, and conditional settings. Print
Management is controlled at the module, account, or transaction level and
can control the number of copies to produce, multilingual footer text, and
print destination.

Print management can be setup in Accounts Receivable, Accounts Payable, and
Projects at the module level. Each original record in Microsoft Dynamics AX
can have default settings associated with it which are defined under the
print management setup. Print Management is setup at a hierarchal level
where you define original record, copy record and settings for any available
documents. You can create up to one original record for each and multiple
copy records for every document type. You can create up to 19 conditional
settings for each original or copy record. To see more on how to setup Print
Management, continue reading.

To Setup Print Management in the Module Level

see image below


<http://www.dynamicscare.com/blog/wp-content/uploads/2010/08/Modulelevel_PM.
png
> Print Management Module Level

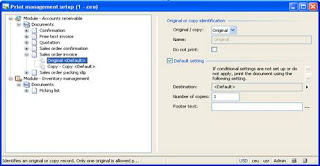
The Print Management Setup Form at the Module Level

Select Print management by following this path: Module (Ex: A/R) > Setup >
Forms > Form Setup > Print Management button

-Select the document level (Ex: Sales Order Invoice)

* To create a new record you can Ctrl N or right-click and select New.

* At the document level you can define your settings

* Check the Default setting check box if you would like to have the
default settings print each time.

* When the check box is not selected then the document can print
according to a selected query for a conditional setting if it successfully
returns results.

* Destination: Where the document will be printing

* Number of Copies: enter a numerical value

* Footer Text: By clicking the 3 dots button will allow you to print
footer texts in different languages. Otherwise you can enter your text in
the dialog box. *50 character maximum

Print Management at the Account Level

see images below


<http://www.dynamicscare.com/blog/wp-content/uploads/2010/08/AccountLevel_PM
.png
>
http://www.dynamicscare.com/blog/wp-content/uploads/2010/08/AccountLevel_PM.
png

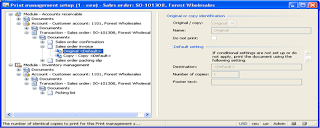
The Print Management Setup Form Account Level


<http://www.dynamicscare.com/blog/wp-content/uploads/2010/08/accountlevel.pn
g
>
http://www.dynamicscare.com/blog/wp-content/uploads/2010/08/accountlevel.png

Print Management Button From Accounts List View

Select Print Management by following this path: Module (Ex: A/P) > Vendors >
Select an Account > Click the Setup Button > select Print Management.

-Select the document level by maximized the selections

* On the right side of the panel you will see the selections.

* Blue Arrows indicate settings that are inherited from the module
level that were setup previously. For changes to the settings there are
four options. You can override, copy, create a new record, or creating a new
setting.

* To override: Right click the original or copy record and select override.
A red "X" indicates it has been overridden.

* To copy: Right click the original or copy record and select copy. It must
be renamed.

* To create a new original or copy record: right click the type of record
in the list and select New.

* To create a new setting: right click and select new.

Print Management at the Transaction Level

The following table gives a list of the supported documents in Accounts
Payable. This may be necessary if these documents print to a certain
printer, ect.

<http://www.dynamicscare.com/blog/wp-content/uploads/2010/08/table.png>
http://www.dynamicscare.com/blog/wp-content/uploads/2010/08/table.png

Conditional Settings in Print Management

-Can be setup using under Print management on the right side of the screen.
The more complex the query or greater conditional settings can affect
posting performance.

* To do this: select the original or copy record, right click and
select new.

* Enter a description

* Click the select button

* Query-Settings form enter a query in the criteria field. Click Ok
when finished.

* Many conditions can be setup on the document.

Faiqa Usman, Support Manager

Sep 28, 2010

Support Alert......!!!! Resetting a Production Order Status in AX2009

Resetting a Production Order Status in AX2009

The Production Order is released, and started as planned....but then,
Production Control decide that the decision to "Start" production, was the
wrong decision, so they must reset the Production Order. This is done by
clicking the "Update" button and selecting "Reset Status".

Click the "Update" button

<http://www.dynamicscare.com/blog/wp-content/uploads/2010/01/mg11.jpg> mg1

From the options, select "Reset Status"

<http://www.dynamicscare.com/blog/wp-content/uploads/2010/01/mg21.jpg> mg2

When the reset form is displayed, AX suggests the desired status to reset
back to.....there is no indication that you have a choice, and if you accept
the default, AX implies that you have to reset status, one step at a time.

This is not the case!

By clicking in the "Desired Status" field, a drop down icon becomes
visible......

<http://www.dynamicscare.com/blog/wp-content/uploads/2010/01/mg3.jpg> mg3

Simply select the desired status from the list and click"OK".

The Production Order will be reset back to the selected status.

Sep 25, 2010

Support Alert......!!!! Budgeting with Period Allocation Keys in Dynamics AX 2009

Budgeting with Period Allocation Keys in Dynamics AX 2009

This post will introduce the concept of period allocation keys, show how
they are setup with the Period Allocation Key Wizard, and how they are
integrated with the budget.

Budgeting is important because companies need to know their actual versus
predicted forecasts for the year. Period allocation keys in Dynamics 2009
make the budgeting process easier by allowing users to create budget models
that can be used over several budget time frames. Not only do period
allocation keys duplicate the allocation data for multiple budgets, they can
also help reflect fluctuations brought on by season.

AX 2009 utilizes a wizard to guide users through the setup of Period
allocation keys. The Period Allocation Key Wizard is located at General
Ledger>Setup>Periods>Period allocation keys>Wizard button.

<http://www.dynamicscare.com/blog/wp-content/uploads/2010/07/pakwiz2.png>
http://www.dynamicscare.com/blog/wp-content/uploads/2010/07/pakwiz2.png

The Allocation Form in the Period Allocation Key Wizard

The wizard will step through Allocation, Dimension, and Name forms. In the
Allocation form, the user selects the time between periods and how long the
periods will last. The Dimension form allows users to associate period
allocations keys to certain financial dimensions. In the Name forms, users
enter an identification key and name for the Period allocation key. Before
completing the wizard, users are presented with an overview screen to review
the Period allocation key setup and adjust the period allocation percentage
if desired.

Period allocation keys can also be manually created or copied from existing
keys. If users want to create a complex allocation key (one with widely
varying period allocation percentages), they might find it easier to edit
the percentage using the Period allocation keys lines form. This form is
accessed via General Ledger>Setup>Periods>Period allocation keys>Lines
button. The form offers a better view of the percentages and has a field
with the remaining percentage to be used in the key. Keys that have been
created with the Copy button can be edited in the same manner.

Once the Period allocation keys have been created, applying them to budgets
is a snap. To apply Period allocation keys, select from General
Ledger>Ledger budget>General tab.

Sep 24, 2010

Dynamics Tip.....Do You Know.....!!!

Audit Trails can help you with data control and monitoring as well as
security. An Audit Trail is a chronological record of transactions that is
automatically generated with a unique numeric ID. In Dynamics AX 2009, an
Audit Trail Inquiry shows you the details of the user who created an entry,
the date of the entry, and the time of the entry.

The Audit Trail Form allows you to monitor the activity of the system and
hold users accountable for the transactions they post.

You can access Audit Trail by clicking General Ledger - Inquiries - Audit
Trail

Faiqa Usman, Support Manager,

FW: Support Alert.....!!!! Simulating Exchange Adjustments in Dynamics AX 2009

Simulating Exchange Adjustments in Dynamics AX 2009

Dynamics AX 2009 offers a variety of simulation and forecasting tools as
well as reports. These features filter complex data into a clear form that
can be used in decision making. A quick Exchange Adjustment Simulation will
illustrate how a business issue is solved easily using Dynamics AX 2009.

What if you want to see the effects of an exchange adjustment on open
customer transactions before you actually make the adjustment?

That is when you would want to use a Simulation provided by Dynamics AX
2009.

-You can access the Exchange Adjustment Simulation from either Accounts
Receivable or Accounts Payable by clicking Periodic followed by clicking
Exchange Adjustment.

-Click the Simulation button on the right side of the form.

-This brings up the Exchange Adjustment Simulation form pictured:


http://www.dynamicscare.com/blog/wp-content/uploads/2010/08/Exchange-Adjustm
ent-Sim.png

-If you click on the drop down arrow for Method you will see three options:

* Standard, which makes adjustments based on the exchange rate used on
the date specified in the Date of Rate field.

* Minimum, which only makes and adjustment if a loss occurs but does
not if there is a profit.

* Invoice Date, which offsets any exchange adjustment that is not
already offset. This causes the transaction to be valued at the original
value.

-Next, select the Considered date to find all the transactions that are open
on that date and an exchange adjustment will be made automatically if
necessary. For transactions that are open on this date, but are settled
before the exchange adjustment date, adjust in the periodic job.

-Enter the date of rate in the Date of rate field. This determines the
exchange rate used in the adjustment.

-Click the Select button on the right side to choose the data you want in
the report.

-You can use the Options button on the right side to choose how to print or
save the report.

-Finally, simply click OK to view the report. The simulation report shows
all the open balances in the originating currency as well as the company
currency. The report also lists the exchange rates that were used in the
simulation.

This was just a simple example of Dynamics AX 2009's capability to get
valuable results in an efficient manner.

Faiqa Usman

Sep 19, 2010

Customer Care Accelerator for Microsoft Dynamics CRM

The Customer Care Accelerator (CCA) for Microsoft Dynamics CRM focuses on delivering contact center enabling functionality, such as the ability to create a unified desktop by combining data elements from disparate line of business applications and displaying it in a single user interface. The core Customer Care business scenarios highlighted by this accelerator include the following:
09-Sept-2010 NEW!! We have included a set of Visual Studio templates for building components for UII that work for VS 2008 and VS 2010 - go to the Downloads tab for more details!
Integrated desktop: Customers can aggregate information from diverse business applications into an integrated desktop providing employees with a 360° view of the customer interactions. Customer service representatives have immediate access to business critical information to serve customers quickly and efficiently, increasing customer satisfaction and loyalty.
Eliminating Duplicate Data Entry: Organizations can streamline business processes by creating desktop automation workflows. Process automation eliminates the need for agents to re-enter the same data in multiple applications. Minimizing duplication helps to reduce human error and ensures a consistent customer service experience.
Computer Telephony Integration (CTI): Organizations are provided with a consistent framework to connect CTI systems with key line of business applications.
Activity Reporting: Contact center managers have swift access to agent desktop transaction reporting, helping them to identify process bottlenecks.
As with all the other Microsoft Dynamics CRM 4.0 accelerators, CCA is available as permissive shared source and is a reference example that can be adapted to fit the needs of a customer as well as additional business scenarios.
Please note: This accelerator provides a reference example of how Microsoft Dynamics CRM in conjunction with User Interface Integration (UII) for Microsoft Dynamics CRM can be leveraged to deliver a composite agent desktop application. It is important that customers wishing to utilize the solution should have a solid understanding of .NET development and thoroughly review the UII materials as part of their evaluation of this accelerator.
Additionally, take the time to review the license terms before you get started.

Last edited Sep 10 at 1:34 AM by reubenk, version 4

Want to leave feedback?
Please use Discussions or Reviews instead.

Customer Care Accelerator for Microsoft Dynamics CRM

Sep 17, 2010

Now Available: Internet Explorer 9 Beta


View this e-mail in your browser

Microsoft Partner Network Follow us:
Twitter Facebook
Microsoft Partner Network Newsletter | September 15, 2010
You are receiving this newsletter at your request. To manage your subscription, go to the
Microsoft Subscription Center and sign in with your Windows Live ID.

Get Ready for a More Beautiful Web

Today, the Web is a communication hub. It's how people connect with friends, colleagues, and customers. How information is shared and projects are completed. How business is done. Yet the Web experience is not as fast, rich, or accessible as it could be. The new Windows Internet Explorer 9 Beta browser changes that, by leveraging the power of your PC to deliver more vibrant, immersive Web experiences, coupled with unparalleled performance.


Now websites and Web applications can provide the same functionality you expect from the software installed on your PC. A new interface increases your viewing area, and enhanced integration with the Windows 7 operating system means you can pin websites and applications directly to the taskbar and create customized Jump Lists that put the tasks you use most often just one click away. And a robust set of built-in security, privacy, and reliability technologies makes browsing safer than ever.

Learn more about the Internet Explorer 9 Beta release and watch demos to see how it works. Join the Microsoft Partner Network to access exclusive training opportunities. Then download the beta to experience a faster, cleaner, and more beautiful Web for yourself.

Start Exploring

Explore a more beautiful web.
Why Join? | Microsoft Partner Portal | Enroll in the Partner Network
Microsoft Lync RC Available Today!
Microsoft Lync is the new name for a new generation of Microsoft real-time communications products for business (formerly known as Microsoft Office Communications products). Lync Release Candidate (RC) ushers in a new connected experience, making each interaction more collaborative, engaging, and accessible from anywhere. Use the prerelease software to get firsthand experience with new features that can enhance your customer engagements and accelerate your sales cycle. Download the RC today.
Build Your Business
Handle More SharePoint Server 2010 Business
Register now for SharePoint 2010 Practice Accelerator sessions to get a comprehensive set of reusable tools and resources, introduced with training through Microsoft Office Live Meeting.
Manage Multiple Forefront Protection Servers More Efficiently
The Microsoft Forefront Protection Script Kit enables multiserver management from a single location. And extensible command-line scripts in the kit make it possible to discover, configure, deploy, and integrate servers with the management technology you already own.
Network News

More Efficiently Manage Multiple Servers That Run Forefront Protection

Share Microsoft Dynamics Leads, Get Rewarded
Earn a fee of up to US$20,000 when partners who specialize in Microsoft Dynamics solutions close sales with referrals from you.

Learn about Microsoft Action Pack Solution Provider Benefits
Become a new subscriber and receive expanded benefits, such as sales skills training and access to quarterly support Web seminars. Order today.

Training and Readiness
Take Windows 7 Training and You Could Win a Flip SlideHD Camcorder
Join the Microsoft Partner Network, complete any of a select collection of Windows 7 training sessions, and you could be a winner.
Microsoft Is "All in" the Cloud. How about You?
Unlock New Knowledge: Access Exclusive Training Resources
Microsoft partners have access to a wealth of training for Microsoft software, solutions, competencies, and certifications. Not yet a Microsoft partner? Enroll now.
Technical Support
Solve Break-Fix Issues with Online Technical Communities
Join the Microsoft Partner Network and get unlimited online technical support as part of your membership benefits at no additional cost.
Offers and Promotions
Attain the Desktop Competency for a Chance to Win Big
Join the Microsoft Partner Network, add the Desktop competency to your portfolio, and enter for a chance to win a Flip Ultra camcorder.
Licensing
How Many Windows Server CALs Do You Need?
Learn how to use the Software Usage Tracker, a tool in the Microsoft Assessment and Planning Toolkit 5.0, to calculate the number and type of licenses needed.
Twitter Follow Us on Twitter
Facebook Like Our Page on Facebook
Check Out Internet Explorer on Facebook
Follow Internet Explorer on Twitter
Get Updates at the Internet Explorer Blog

Simplify development with Visual Studio 2010 and Action Pack Development and Design. Subscribe today. >

Visit the Microsoft Partner Network Portal

Newsletter Legal Information

This newsletter was sent by:
Microsoft Corporation
One Microsoft Way
Redmond, Washington, USA
98052

Microsoft
Sign Up for Other Newsletters | Update Your Profile
© 2010 Microsoft Corporation.    Terms of Use | Trademarks | Privacy Statement