Dec 16, 2011

Support Alert ...!!!About the Configure account structures form [AX 2012]

About the Configure account structures form [AX 2012]

A relational chart of accounts uses an account structure that requires that
you set up valid accounts and financial dimension values, and then set up
rules to specify how the accounts and dimensions will come together to
create account structures. Setting up valid combinations helps make sure
that data entry is accurate.

You can use the Configure account structures form to create one or more
account structures. Account structures consist of main accounts and can
include financial dimension segments. The account structures are used to
define the valid combinations which, together with the main accounts, form a
chart of accounts.

You can view the whole account structure, which includes the valid
combination of values that can be entered in a dimension, in the following
ways:

* Horizontally - View the columns that show the dimensions that make
up the structure.
* Vertically - View the hierarchical visualization of the rules that
describe how the combinations behave.

When you use multiple account structures, you can track information for
specific accounts without affecting information in other accounts.

http://i.msdn.microsoft.com/Global/Images/clear.gif The Configure account
structures form

Configure account structures form

http://i.msdn.microsoft.com/Global/Images/clear.gif Account structure
elements


Number

Element


1

Active account structure


2

Draft account structure


3

Account structure segment


4

Filter button


5

Add segment button


6

Action menu


7

Add %1 node button

http://i.msdn.microsoft.com/Global/Images/clear.gif Account structure terms
and definitions


Term

Definition


Account structure

A structure that defines the valid combinations of main account and
dimension values.


Segment

Each column in the Configure account structures form. Segments consist of
main accounts or financial dimensions.


Filter button

A button that opens the Which values are allowed for the %1 field form,
where you can specify the values that are allowed for each segment.


Action menu

A menu icon that is displayed next to segment rows. Click the Action menu to
set active dates and to copy, paste, delete, or move segments.


Combination

The arrangement of account segments, advanced rules, and criteria.


Advanced rule

A relationship principle that helps make sure that dimension values are
entered correctly, and are filtered and validated according to the dimension
structure. Advanced rules are defined for each account structure.


Financial dimension

An attribute that additionally defines an entity.


Ledger account

The combination of main account and other dimension values, as defined by
the chart of accounts, and which classifies financial activity.


Main account

The type of record-asset, liability, revenue, expense, or owner's
equity-that is used for recording individual transactions in an accounting
system.

Faiqa Khushi

Sep 19, 2011

FW: Lync web configure

Dear All,

* You can configure your Lync on Web browser.

*
http://www.expta.com/2010/09/how-to-integrate-lync-server-2010-with.html

Lync Server 2010 can be integrated with Exchange 2010 SP1, so that Exchange
Outlook Web App can also act as a Lync web client. Once integrated, users
will automatically log into Lync when they log into OWA. The OWA interface
changes to include the following new features:

Thanks & Regards,

Usman Masud

Jun 28, 2011

GP2010 Upgrade Steps

Here are all the steps which I've followed to upgrade the Microsoft Dynamics
GP 10 to Microsoft Dynamics GP 2010.

Steps to follow the Upgrade to GP2010

Upgrade Microsoft SQL Server

1. Take the backup of the databases and installed directory of SQL
Server 2005.

2. Run SQL Server 2008 R2 setup and click on upgrade.

(sometimes no features appeared to be selected to upgrade into the latest
version, to counter this problem, you make sure the previous release of SQL
must be installed fully and correctly. This may also cause because of
unlicensed features of Microsoft SQL Server previous release. In that case
you'll need to license the previous release too.)

Upgrade Microsoft Dynamics GP

Service Pack 4 or 5 is the prerequisites to upgrade to the latest version of
GreatPlain. Please follow these steps to quickly upgrade your systems.

1. Take the backup of customized reports and forms.

2. Take the backup of GP 10.0 installed directory and databases too,
if not taken yet.

3. Apply SP4 on GP 10.

a. Run GP 10 Utilities.

b. GP10SP4 required DYNSA user to update the company database.

c. Create DYNSA user manually in SQL Server Management Studio.

d. Again run GP 10 Utilities

e. Update the company with SP4 through GP Utilities.

4. Take the backup of installed directory of Microsoft Dynamics GP 10
again.

5. Install Microsoft Dynamics GP 2010 R2

6. Upgrade the company through GP2010 Utilities.

a. Utilities will not allow you to select the company for upgrade and
show you this status "Company is being upgraded by another client." (you
can't proceed further, until the locked user is unlocked.)

b. Run this SQL script in SQL Management Studio on DYNAMICS database to
exit the unlocked users.

"Delete DuLCK"

c. Run GP Utilities and upgrade the company with GP2010.

7. Module functionality will be disabled until you enter the new keys
for MSD GP 2010. New keys will be provided at Microsoft Customer Source.

8. Enter the keys and restart the GP2010.

Note: This document is also available at Maison Share Point Portal. Please
follow this link to download it in docx format.


<http://sp.maisonportal.net/doc/Shared%20Documents/Steps%20to%20follow%20the
%20Upgrade%20to%20GP2010.docx>
http://sp.maisonportal.net/doc/Shared%20Documents/Steps%20to%20follow%20the%
20Upgrade%20to%20GP2010.docx

or


<http://sp.maisonportal.net/doc/Shared%20Documents/Steps%20to%20follow%20the
%20Upgrade%20to%20GP2010.docx> Upgrade Steps

In case of any query, kindly do let me know.

Regards

Umair Hassan

Functional Consultant,

Jun 9, 2011

Support Alert....!!!! How to Create Transaction Text so That You Can Record Information for a Transaction Reversal in Microsoft Dynamics AX 2009

How to Create Transaction Text so That You Can Record Information for a
Transaction Reversal in Microsoft Dynamics AX 2009

When you reverse a transaction, Microsoft Dynamics AX 2009 does not copy the
transaction text of the original transaction to the transaction reversal.
However, you can create transaction text so that you can record information
for the transaction reversal.

To create transaction text for the transaction reversal, follow these
steps:

1. Log on to Microsoft Dynamics AX 2009

2. Click Basic, expand Setup, and then click Transaction text.

3. In the Transaction texts dialog box, press CTRL+N to create a new
record.

4. For the record that you created in step 3, click Transaction
reversal in the Transaction text list, click a language in the Language
list, and then type text in the Text field.

Notes

* The text that you type in the Text field is the text that you want
to add to the transaction reversal.

* You can combine the text with enumerated texts and with
automatically-generated texts.

* The enumerated texts contain phrases that you type in the Text
field.

* Automatically-generated texts contain the following parameters:

* %1
If you type %1 in the Text field, Microsoft Dynamics AX 2009 automatically
generates the date of the transaction.

* %2
If you type %2 in the Text field, Microsoft Dynamics AX 2009 automatically
generates an ID for the program that generates the information.

* %3
If you type %3 in the Text field, Microsoft Dynamics AX 2009 automatically
generates the voucher number of the transaction.

5. Save the record.

May 20, 2011

How to Work with Miscellaneous Charges in Foreign Currency in Microsoft Dynamics AX

How to Work with Miscellaneous Charges in Foreign Currency in Microsoft
Dynamics AX

This article describes how to work with miscellaneous charges in foreign
currency in Microsoft Dynamics AX.

More Information


Setup


To work with miscellaneous charges, you must create miscellaneous charges
codes. You create these miscellaneous charges codes in Accounts Payable and
in Accounts Receivable in Microsoft Dynamics AX as follows:

* To create the miscellaneous charges codes in Accounts Payable, click
Accounts Payable, expand Setup, expand Misc. Charges, and then click Misc.
charges codes.

* To create the miscellaneous charges codes in Accounts Receivable,
click Accounts Receivable, expand Setup, expand Misc. Charges, and then
click Misc. charges codes.


Miscellaneous Charges Codes


The following are the codes that you can use when you configure
miscellaneous charges codes.

In Accounts Payable

* The Item - Vendor charge code is used in purchase orders.

* The Ledger Account- Vendor (Expense - Vendor) charge code is used in
purchase orders.

* The Ledger Account - Ledger Account (Expense - Ap Accrual) charge
code is used in purchase orders.

* The Item - Ledger Account (Item - Ap Accrual) charge code is used in
purchase orders and in purchase invoices.
To use these charge codes in a purchase order, click Accounts Payable, click
Purchase order, click Setup, and then click Misc. charges

To use the Item - Ledger Account (Item - Ap Accrual) charge code in a
purchase invoice, click Accounts Payable, expand Inquiries, expand Journals,
click Invoice, click Misc. charges, and then click Adjustment.

In Accounts Receivable

* The Customer - Ledger Account (Customer - Income/revenue) charge
code is used in sales orders and in free text invoices.

* The Ledger Account - Ledger Account (Expense - Ap Accrual) charge
code is used in sales orders and in free text invoices.
To use these charge codes, click Accounts Receivable, click Sales order,
click Setup, and then click Misc. charges.

Note You cannot select the Item option when you configure miscellaneous
charges in Accounts Receivable.

Charge codes for foreign currency
When you use foreign currency in miscellaneous charges, you must consider
the configuration of the miscellaneous charges code that is used in the
transaction to achieve the expected result.

In Accounts Payable

* Use the Item - Vendor charge code when the currency that is used by
the miscellaneous charges code is the same currency that is used in the
purchase order. The exchange rate is taken from the purchase invoice posting
date. The exchange rate cannot be changed.

* Use the Ledger Account - Vendor (Expense - Vendor) charge code when
the currency that is used by the miscellaneous charges code is the same
currency that is used in the purchase order. The exchange rate is taken from
the purchase invoice posting date. The exchange rate cannot be changed.

* Use the Item - Ledger Account (Item - Ap Accrual) charge code when
the currency that is used by the miscellaneous charges code may differ from
the currency that is used in the purchase order. The exchange rate is taken
from one of the following:

o The exchange rate is taken from the purchase invoice posting date. You
cannot change the exchange rate.

o The exchange rate is taken from the invoice adjustment after you
specify the currency and the exchange rate date.

* Use the Ledger Account - Ledger Account (Expense - Ap Accrual)
charge code when the currency that is used by the miscellaneous charges code
may differ from the currency that is used in the purchase order. The
exchange rate is taken from the purchase invoice posting date. You cannot
change this date even though the currencies in the purchase order and in the
miscellaneous charges are different.

In Accounts Receivable

* Use the Customer- Ledger Account (Customer - Income/revenue) charge
code when the currency that is used by the miscellaneous charges code is the
same currency that is used in the sales order or in the free-text invoice.
The exchange rate is taken from the sales invoice posting date. The exchange
rate cannot be changed.

* Use the Ledger Account - Ledger Account (Expense - Ap Accrual)
charge code when the currency that is used by the miscellaneous charges code
may differ from the currency that is used in the sales order or in the
free-text invoice.

The exchange rate is taken from the posting date of the sales invoice or
from the posting date of the free-text invoice. The exchange rate cannot be
changed in the currencies in the sales order.

----------------------------------------------------------------------------
----------------------------------------------------------------------------
---------------------------------------------

Faiqa Usman, Support Manager,

May 16, 2011

Support Alert....!!!! Microsoft Dynamics AX - Production Picking Journal with Two Decimal Spaces CRM:0027802

Microsoft Dynamics AX - Production Picking Journal with Two Decimal Spaces

The BOM (Bill of Materials) quantity fields in the base data and in the
production module (BOM and ProdBOM tables) contain four decimal places in
the standard AX setup. However the Production picking journal only has two
decimal spaces.

In the BOM Lines form, and also within a Production Order in the BOM form,
the Quantity fields are displayed using 4 decimal places, and you can enter
values using up to 4 decimals, for example 1.2345. However, when you want to
record the quantities of Raw Materials used in a Production Order, in a Pick
list Journal, you can only enter those Quantities using 2 decimals.

The reason why you can see and use 4 decimals in the BOM Lines, but only use
2 decimals in Pick Lists is explained below. Note that you can customize
Microsoft Dynamics AX to allow Quantities displayed and entered in such
places as the Pick List to use 4 or more decimals, however this is not
generally recommended unless it is essential for a Customer to do that.

Microsoft Dynamics AX allows you to enter 4 decimals for the Quantity field
in BOM Lines to give you flexibility in how you define the quantity to use
in a BOM.

Below are two examples:

1. For example, if you use 1 kg of salt in a BOM to make a large cake
mix of 1000 kgs, then:

o you may define the BOM Line to use "1.0000" kg of item Salt and with
the field "Per Series" set to 1000.00
Or

o you may prefer to define the BOM Line to say use "0.0010" kg of salt
and with the field "Per Series" set to 1.00

o those two alternatives above will both give the same end result, when
you create a Production Order to make some cake mix..

o then, when you create a Production Order to make 2,000 kg of "Cake
Mix", the BOM Lines are copied into the ProdBom Lines, and it will display
as an expected usage of 2.0000 kg of Salt (as we need 1 kg per 1000 kg of
cake mix. However, when you enter the actual Quantity used in the Pick List,
you would enter it as 2.00.

2. Some customers want to define BOM Line Quantities as percentages,
and all using "Per Series" of 100

o When they do that, raw materials' Quantities may need to be entered
using 4 decimals, to ensure the total quantity of all materials used equals
100.

----------------------------------------------------------------------------
----------------------------------------------------------------------------
---------------------------------------------

Faiqa Usman, Support Manager,

Email: faiqaq@m-consultants.com <mailto:affan.naeem@m-consultants.com>

Apr 1, 2011

Cubes Configuration Process in AX 2009

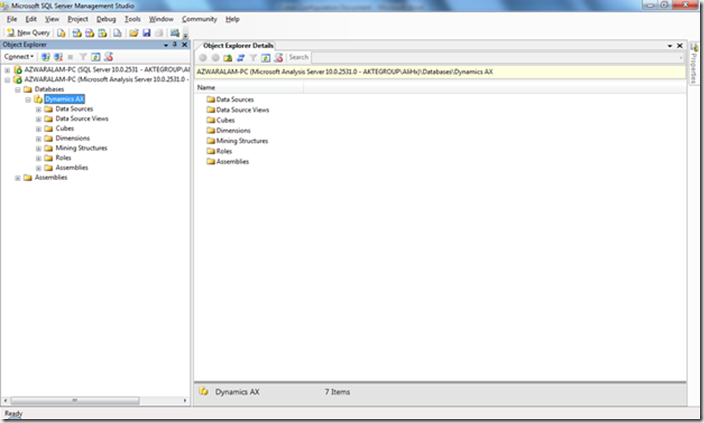
Step 1: Install analysis extension by executing Dynamics AX 2009 Setup. It will create a Dynamics AX database in Analysis Services.

image

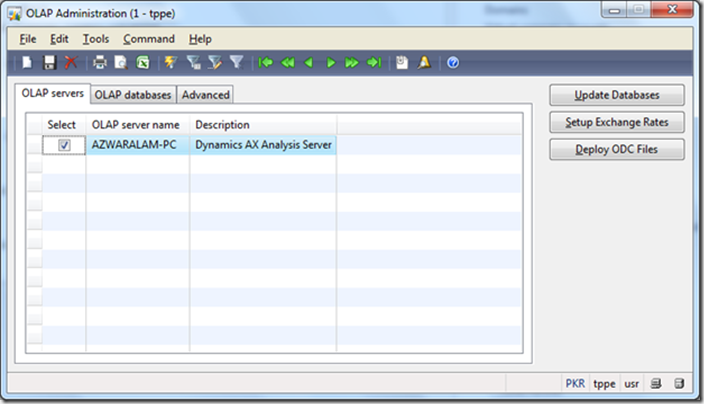
Step 2: Run Dynamics AX 2009 Client and go to > Business Analysis > OLAP > OLAP Administration.

image

Step 3: Set OLAP Server name the one where Analysis Extension create new Dynamics AX database.

image

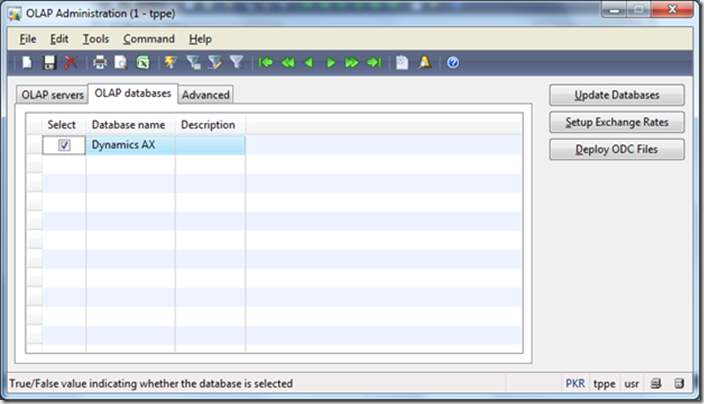
Step 4: Set OLAP database name.

image

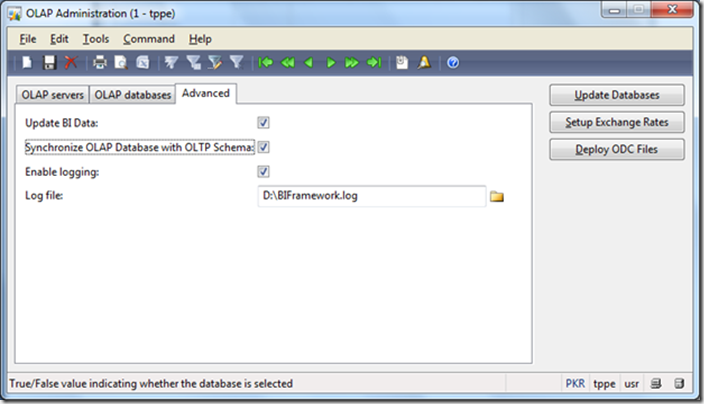
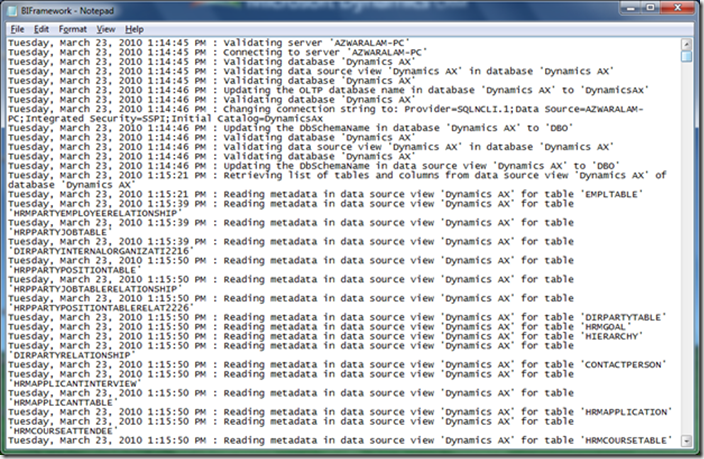
Step 5:- In Advanced Tab Check on Update BI Data, Synchronize OLAP Databases with OLTP Schema and Enable Logging. Set the Log file path and then click on update databases.

-It will take some time approximately 1 hour or more and then log will generate.

image

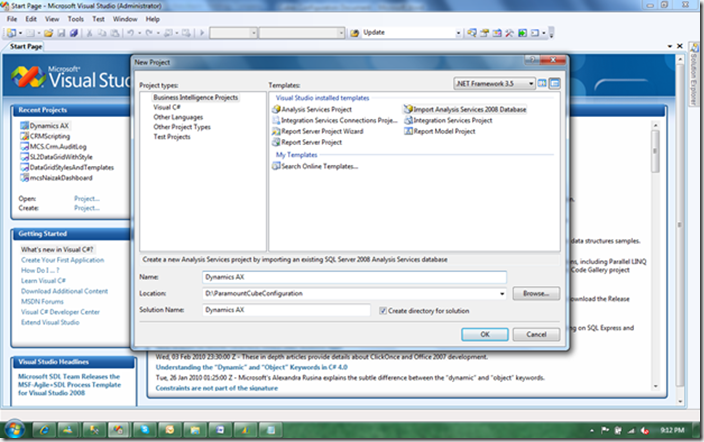
Step 6:- Start SQL Server Business Intelligence Development Studio. Create New Project with the Import Analysis Services 2008 Databases.

-Name the Project Dynamics AX.

image

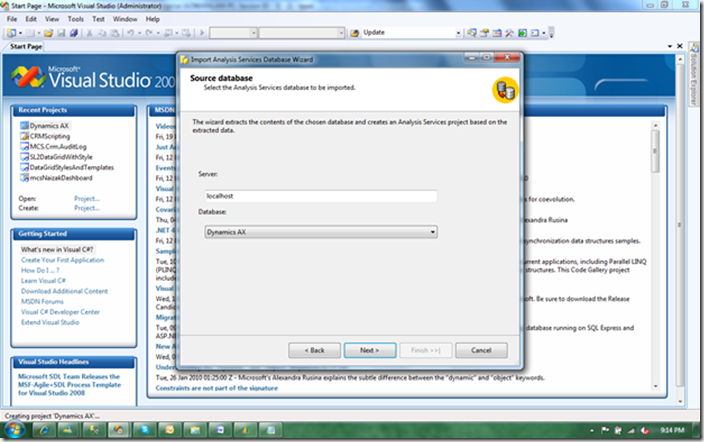
Step 7:- After clicking on Next write Analysis Server name in server and the select analysis services database.

image

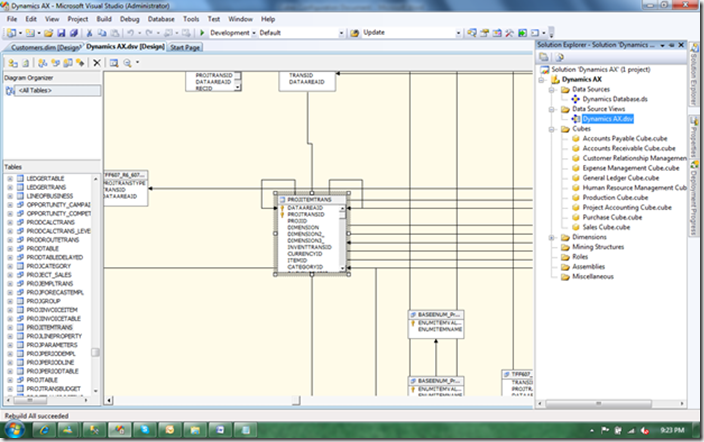
Step 8: After clicking on Finish Dynamics AX Analysis database will be import in SQL Server Business Intelligence Development Studio and then click on Dynamics AX.dsv in data source view.

-On left hand pane it will show you Tables and Views.

image

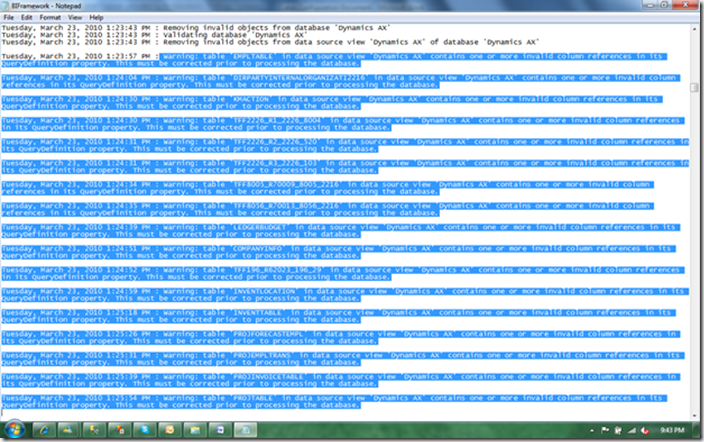
Step 9:- Now go to log file the one that we have generated earlier and search “Warning: table 'EMPLTABLE' in data source view 'Dynamics AX' contains one or more invalid column references in its Query Definition property. This must be corrected prior to processing the database”

image

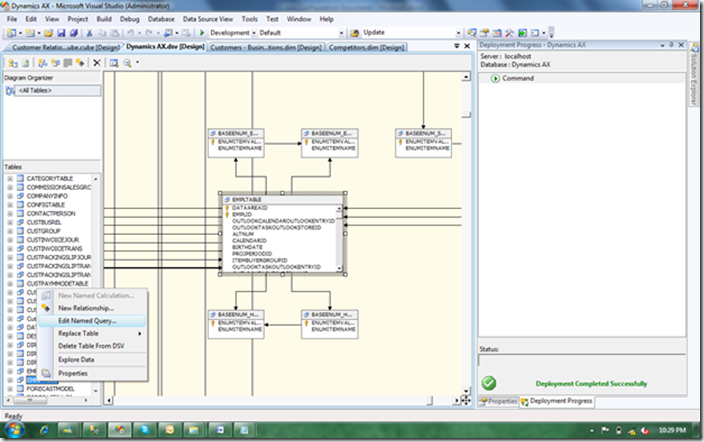
Step 10:- Note the warning table name for example EMPLTABLE and then go to SQL Server Business Intelligence Development Studio right click on EMPLTABLE and then Edit Named Query.

image

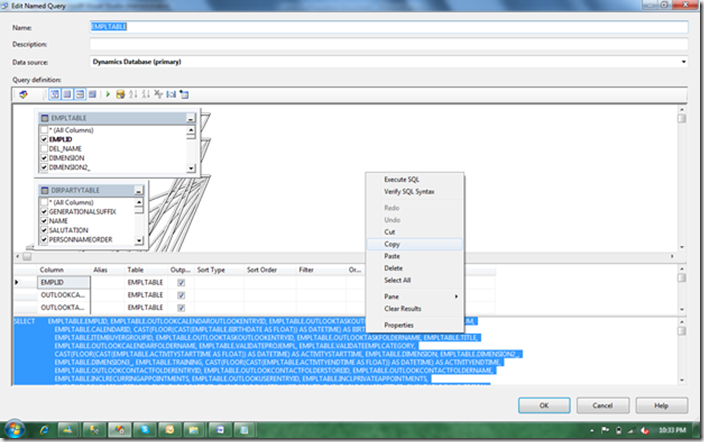
Step 11:- Copy query and then paste it in SQL Server.

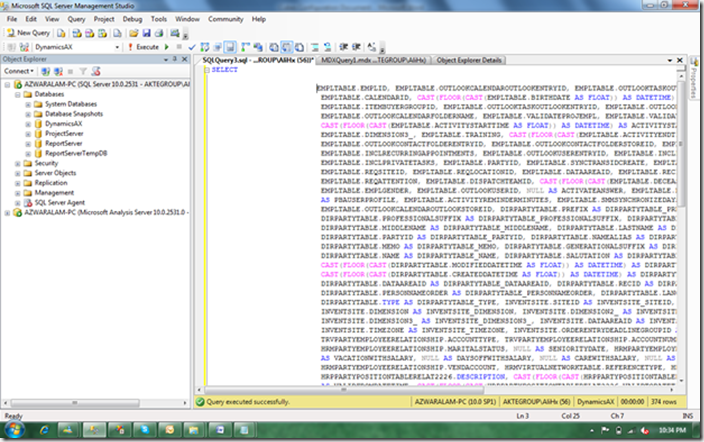
image

Step 12:- Paste query in SQL Server with primary Axapta database selected from which the Main application of Axapta is running.

image

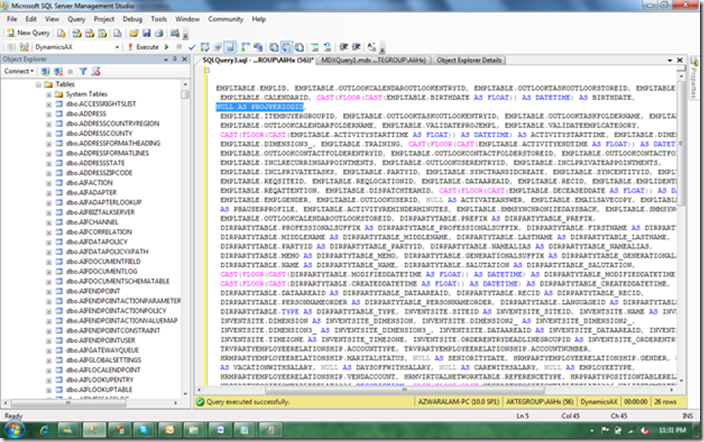
Step 13:- Set invalid columns null in query.

image

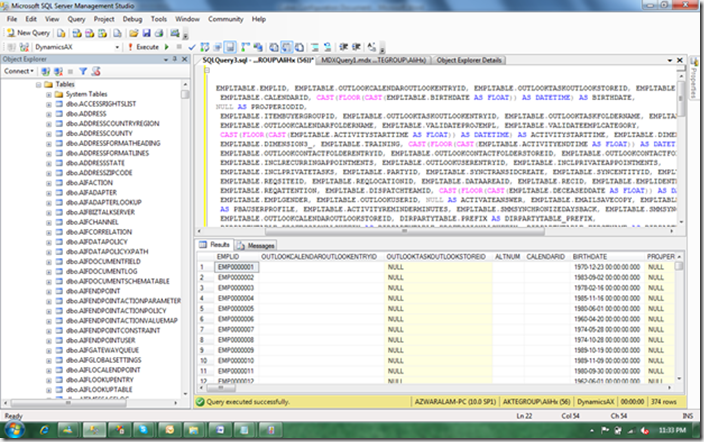
Step 14:- After setting null to all invalid columns execute query.

image

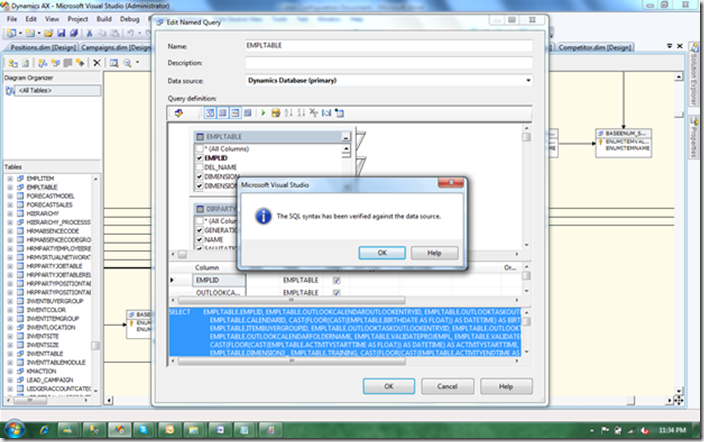
Step 15:- When query run successfully copy it and paste it into SQL Server Business Management Studio and verify SQL by clicking on SQL button and then press OK.

image

Step 16:- Repeat steps 9 to 15 for all warning tables in log file.

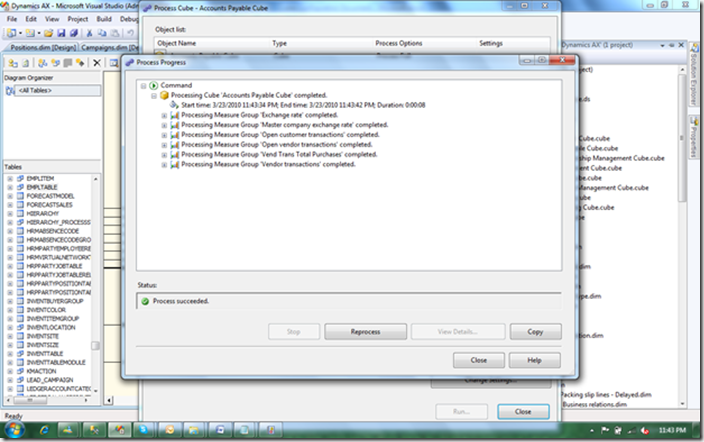
Step 17:- Process cubes one by one in SQL Server Business Intelligence Management Studio.

image

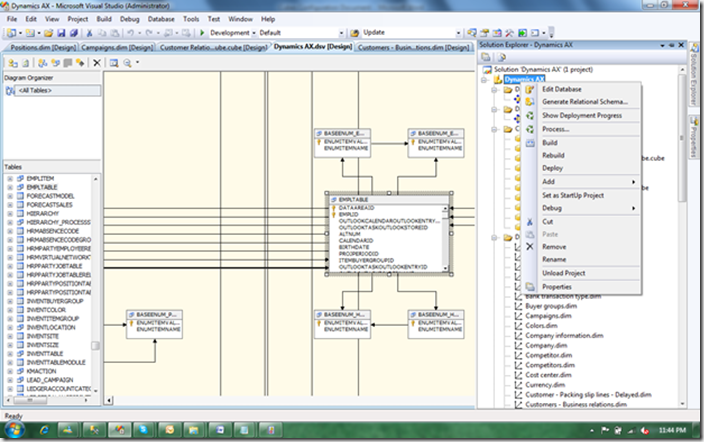
Step 18:- When all cubes process successfully then deploy the project by right click Dynamics AX database in project and click on deploy.

image

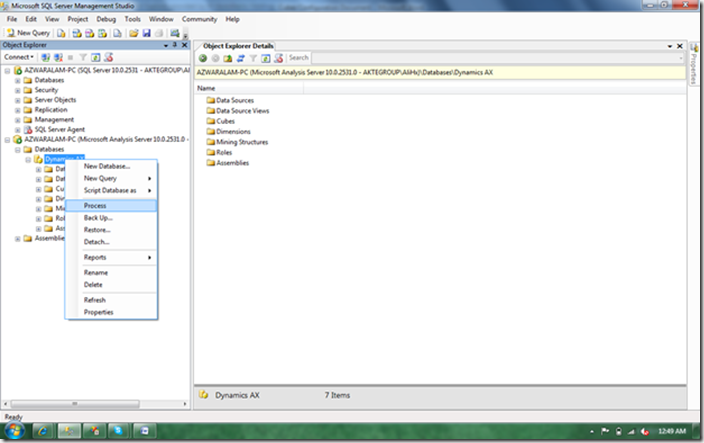
Step 19:- Right click on Dynamics AX database in Analysis server and then process.

image

Mar 25, 2011

Support Alert.....!!! Currency Setup in Dynamics AX 2009 CRM:0027732

<http://www.dynamicsaxtraining.com/knowledge-base-application/currency-setup
-in-dynamics-ax-2009
> Currency Setup in Dynamics AX 2009


To create currency go to General Ledger > Setup > Exchange Rates. The
Exchange rates form opens.


<http://www.dynamicsaxtraining.com/wp-content/uploads/2010/12/Exchange-rates
.png
> Exchange rates form

Exchange rates form

As you can see in above screen shot we have five tabs on this form. First is
the Overview tab. In this tab we'll create new currency. To create new
currency press Ctrl + N, in the Currency field write new currency short name
(3 characters limit), in the Name field write descriptive name for new
currency, in the ISO field select ISO currency code for new currency and in
the Symbol field enter symbol for new currency created.

In the lower pane of the Exchange rates form, are the exchange rates for
currency. You can define exchange rates for each day. If you want to use one
exchange rate leave the Start date field blank. AX will automatically use
last exchange rate, if multiple exchange rates are available.

Next is the General tab which shows same information as in the Overview tab
except the Gender field (Optional if you are not using Spanish check).

Third tab is the Currency convertor tab. Enable currency conversion by check
mark on the Conversion field. Postfix and prefix are character you want to
add before and after amount. Enter spaces before and after postfix and
prefix fields to separate from amount.

I have created the Pakistan Rupees (PKR) with the following setup:


<http://www.dynamicsaxtraining.com/wp-content/uploads/2010/12/Currency-Excha
nge-form-Currency-conversion5.png
> Exchange rates form, Currency converter
tab

Exchange rates form, Currency converter tab

Now I want to view all my amounts in the PRK currency. To do this click the
current currency icon located in the bottom right corner of the status bar.


<http://www.dynamicsaxtraining.com/wp-content/uploads/2010/12/Currency-conve
rter.png
> Currency converter

Currency converter

The Currency converter form opens. Double click on the PKR currency.

After doing above setting we will get the following result in the Chart of
Accounts form.


<http://www.dynamicsaxtraining.com/wp-content/uploads/2010/12/Postfix-and-Pr
efix-change-in-COA-Detail-form1.png
> Chart of accounts form

Chart of accounts form

The Posting tab define Realized loss, Realized profit, Unrealized loss,
Unrealized profit general ledger accounts due to currency exchange rate.


<http://www.dynamicsaxtraining.com/wp-content/uploads/2010/12/ExchangeRatesP
ostingTab.png
> Exchange rates form, Posting tab

Exchange rates form, Posting tab

These settings depend on your company policies and weather you are using
foreign currency for billing and payments. There's a detail article about
Realized and Unrealized profit and loss
<http://www.dynamicsaxtraining.com/knowledge-base-application/realized-loss-
realized-profit-unrealized-loss-unrealized-profit-in-dynamics-ax-2009
> .

Last tab is the Round-off tab as the name shows it's about rounding off
currency.


<http://www.dynamicsaxtraining.com/wp-content/uploads/2010/12/ExchangeRatesR
oundOffTab.png
> Exchange rates form, Round-off tab

Exchange rates form, Round-off tab

General rounding-off applies to all modules and there are separate settings
for Account Receivable, Account Payables modules and Prices.

Example: We have amount 6827.28. Below table describe how Round Off and
Rounding form works.


Rounding form

Round off .01

Round off .10

Round off 1.00

Round off 10.00

Round off 100.00


Normal

6827.28

6827.20

6827.00

6830.00

6800.00


Upward

6827.28

6827.30

6828.00

6830.00

6800.00


Downward

6827.28

6827.20

6827.00

6820.00

6800.00


Currency setup in General Ledger module


In General Ledger module go to Setup > Parameters. The General ledger
parameters form opens. Go to the Ledger tab:


<http://www.dynamicsaxtraining.com/wp-content/uploads/2010/12/GeneralLedgerP
arameters.png
> General ledger parameters form

General ledger parameters form

In the Express exchange rate field specify how much of your currency equals
to 100 units of foreign currency. The value is used in the Exchange rates
form.

Example: Enter the 50 in the Express exchange rate field. Save parameters.
The Exchange rates form will have the following values.


<http://www.dynamicsaxtraining.com/wp-content/uploads/2010/12/ExchangeRatesN
um.png
> Exchange rates form

Exchange rates form

The Maximum penny difference field contains the maximum difference between
debit and credit amount in the voucher. The difference can appear when debit
or credit amount is rounded (because debit and credit amount is rounded
separately).

The Maximum penny-rounding in the secondary currency field contains the
maximum difference between debit and credit amount in the voucher if this
amount is recorded in the secondary currency.


Setting up company default currency


To set company default currency do the following:

Go to the Basic > Setup > Company information > Other tab > Currency field
group > Currency field

You can select any currency you have created in the Exchange rates form

Mar 24, 2011

Support Alert.....!!! Core Concepts in Production (AXAPTA) CRM:0027731

Introduction (Core Concepts in Production)


Why does the company need to have the Production module? …The answer is for
managing and accounting the Production. What is Production? Production is a
process of creating products. And, what is a product?

From Wikipedia <http://en.wikipedia.org/wiki/Product_%28business%29> :

"The noun product is defined as a "thing produced by labor or effort" or the
"result of an act or a process", and stems from the verb produce, from the
Latin prōdūce(re) '(to) lead or bring forth'."

So the Production module is used for the following purposes:

* Setting up materials (product structure) and resources (operations)
required for a product creation.
* Accounting the product production process (accounting materials and
resources required for producing a product).

In Microsoft Dynamics AX 2009, a product is an item of the BOM item type
(BOM – Bill of materials). Go to Inventory management > Common Forms > Item
details.

<http://www.dynamicsaxtraining.com/wp-content/uploads/2010/06/Product.png>
Product

Product


Setting Up Materials Required for Product Creation (Product Structure)


Product structure contains the information about the materials that are
required for building the product.

Item of the BOM item type (product) must be associated with the Bills of
Materials.

From Wikipedia <http://en.wikipedia.org/wiki/Bill_of_materials> :

"The bill of materials (BOM) is a list of the raw materials, sub-assemblies,
intermediate assemblies, sub-components, components, parts and the
quantities of each needed to manufacture an end product".

To view the BOM associated with the item, in the Item form, select necessary
item and click the BOM > Lines menu button.

<http://www.dynamicsaxtraining.com/wp-content/uploads/2010/06/BOMLines.png>
BOM Line form

BOM Line form

In our demo data, the 1101 item is associated with the BOM-1101-1-1 BOM. In
the BOM line form, we can see the components that are used in order to
produce the 1101 item.


Setting Up Resources Required for the Product Creation (Operations)


An operation contains information about the resources that are required for
building the product.

An item of the BOM item type must be associated with the Route. A Route
defines operations and their sequence required for producing the product.
The operation contains information about the working time and the required
resources. So, we can say that:

* BOM contains information about the materials required for building
the product.
* Route contains information about the working time and the resources
required for building the product.

Resources are presented in Microsoft Dynamics AX as work centers. In
Microsoft Dynamics AX 2009, a work center can be of the following types:

* Machine
* Tool
* Human
* Operator
* Vendor

To view the Route associated with the item, click the Route button in the
Item form.

<http://www.dynamicsaxtraining.com/wp-content/uploads/2010/06/Route.png>
Route form

Route form

In our demo data, the 1101 item is associated with the 1001 Route. In the
Route form, we can see the operations (work centers, working time) that are
used for producing the 1101 item. We will learn how to understand the
information presented in the Route form in the next lesson.

How are the operations and the materials connected?

Each material is manually associated with a specific operation.

1. In the Item form, click the BOM > BOM lines menu button.
2. Go to the General tab and enter the necessary operation in the Oper.
No. field.

With the help of the BOM designer, do the following:

1. In the Item form, click the BOM > Designer menu item.
2. Drag and drop product materials to a specific operation.


<http://www.dynamicsaxtraining.com/wp-content/uploads/2010/06/BOMDesigner.pn
g
> BOM designer form

BOM designer form


Accounting Product Production Process (accounting materials and resources
required for production of a product)


A production order is used for managing the product creation process. It can
be created from a sales order.

The production order follows a sequential "production life cycle". The life
cycle reflects the actual steps that are taken to manufacture an item. It
begins with the creation of a production order and ends with a finished,
manufactured item that is ready for the customer. Each step in the life
cycle requires different kinds of information.

When the production order is ended, items that will be consumed are deducted
from the inventory, the created product is added to the inventory and the
costs of materials and resources are recorded to the general ledger
accounts.


summary:


1. Production module is use for:

* Setting up materials (product structure) and resources (operations)
required for creating a product
* Accounting product production process (accounting materials and
resources required for producing a product)

2. Product is an Item of the BOM item type.
3. Product is associated with a BOM and a Route.

* Bills of Material – BOMS
A Bill of Material or a BOM defines the recipe for making a product. Think
of it as a list of ingredients which includes all the sub-assemblies,
components, and raw materials required for making a single finished product.

* Routes and Operations
A production route defines the process which is used for making a finished
product. Sequential steps, or operations, are created which describe the
Work Centres involved in the production process and how much time it takes
to carry out each operation.
* Work Centres
Work Centres represent production resources available to a company for
making products. In Microsoft Dynamics AX 2009, a Work Centre can be a
Machine, a Tool, a Human Operator, or a Vendor.

4. A Production order is used for managing the product creation
process.

Mar 21, 2011

Quote (Test)

To start mail merge, click CRM.


In Microsoft Office Word 2007, the CRM button appears on either the Add-ins tab or the Mailings tab, depending on the mail merge template you selected.


After you click CRM, the macro creates a new text file and puts the comment data into it. The comment is the data source for your mail merge.[CRM1] 


Caution: To run mail merge, you must enable macros for this document. After the mail merge is completed, delete this file and the associated text file to safeguard possibly sensitive data.


<TABLE><TH>Bill_To_City</TH><TH>Bill_To_Country_Region</TH><TH>Bill_To_Fax</TH><TH>Bill_To_Street_1</TH><TH>Bill_To_Street_2</TH><TH>Bill_To_Street_3</TH><TH>Bill_To_ZIP_Postal_Code</TH><TH>Bill_To_State_Province</TH><TH>Bill_To_Phone</TH><TH>Potential_Customer</TH><TH>Description</TH><TH>Quote_Discount_Amount</TH><TH>Quote_Discount_</TH><TH>Effective_From</TH><TH>Effective_To</TH><TH>Due_By</TH><TH>Freight_Amount</TH><TH>Freight_Terms</TH><TH>Name</TH><TH>Opportunity</TH><TH>Owner</TH><TH>Payment_Terms</TH><TH>Price_List</TH><TH>Quote_ID</TH><TH>Requested_Delivery_Date</TH><TH>Revision_ID</TH><TH>Shipping_Method</TH><TH>Ship_To_City</TH><TH>Ship_To_Country_Region</TH><TH>Ship_To_Fax</TH><TH>Ship_To_Street_1</TH><TH>Ship_To_Street_2</TH><TH>Ship_To_Street_3</TH><TH>Ship_To_ZIP_Postal_Code</TH><TH>Ship_To_State_Province</TH><TH>Ship_To_Phone</TH><TH>Total_Amount</TH><TH>Total_Pre_Freight_Amount</TH><TH>Total_Detail_Amount</TH><TH>Total_Tax</TH><TH>Product_ID</TH><TH>Quote_Product_Ship_To_Street_1</TH><TH>Quote_Product_Ship_To_Street_2</TH><TH>Quote_Product_Ship_To_Street_3</TH><TH>Quote_Product_Ship_To_City</TH><TH>Quote_Product_Ship_To_State_Province</TH><TH>Quote_Product_Ship_To_Country_Region</TH><TH>Quote_Product_Ship_To_ZIP_Postal_Code</TH><TH>Quote_Product_Ship_To_Phone</TH><TH>Quote_Product_Ship_To_Fax</TH><TH>Quote_Product_Product</TH><TH>Quote_Product_Volume_Discount</TH><TH>Quote_Product_Price_Per_Unit</TH><TH>Quote_Product_Quantity</TH><TH>Quote_Product_Amount</TH><TH>Quote_Product_Manual_Discount</TH><TH>Quote_Product_Extended_Amount</TH><TH>Quote_Product_Requested_Delivery_Date</TH><TH>Quote_Product_Unit</TH><TH>Quote_Product_Product_Description</TH><TH>Quote_Product_Salesperson</TH><TH>Quote_Product_Tax</TH><TH>LastItem</TH><TR><TD /><TD /><TD /><TD /><TD /><TD /><TD /><TD /><TD /><TD>*Sample</TD><TD /><TD /><TD /><TD /><TD /><TD /><TD /><TD /><TD>*sample</TD><TD>*sample</TD><TD>{D7BF5328-D123-DF11-AA31-001372F920BA}</TD><TD /><TD>UAE</TD><TD>QUO-01001-NBF5LW</TD><TD /><TD>0</TD><TD /><TD /><TD /><TD /><TD /><TD /><TD /><TD /><TD /><TD /><TD>$2,744.00</TD><TD>$2,744.00</TD><TD>$2,744.00</TD><TD>$0.00</TD><TD>F001</TD><TD /><TD /><TD /><TD /><TD /><TD /><TD /><TD /><TD /><TD>FISH! Culture v2 FILM</TD><TD>$0.00</TD><TD>$999.00</TD><TD>1.00000</TD><TD>$999.00</TD><TD /><TD>$999.00</TD><TD /><TD>No</TD><TD /><TD>Ahmad Hussain</TD><TD /><TD>0</TD></TR><TR><TD /><TD /><TD /><TD /><TD /><TD /><TD /><TD /><TD /><TD>*Sample</TD><TD /><TD /><TD /><TD /><TD /><TD /><TD /><TD /><TD>*sample</TD><TD>*sample</TD><TD>{D7BF5328-D123-DF11-AA31-001372F920BA}</TD><TD /><TD>UAE</TD><TD>QUO-01001-NBF5LW</TD><TD /><TD>0</TD><TD /><TD /><TD /><TD /><TD /><TD /><TD /><TD /><TD /><TD /><TD>$2,744.00</TD><TD>$2,744.00</TD><TD>$2,744.00</TD><TD>$0.00</TD><TD>F002</TD><TD /><TD /><TD /><TD /><TD /><TD /><TD /><TD /><TD /><TD>FISH! Complete, Pack</TD><TD>$0.00</TD><TD>$920.00</TD><TD>1.00000</TD><TD>$920.00</TD><TD /><TD>$920.00</TD><TD /><TD>No</TD><TD /><TD>Ahmad Hussain</TD><TD /><TD>0</TD></TR><TR><TD /><TD /><TD /><TD /><TD /><TD /><TD /><TD /><TD /><TD>*Sample</TD><TD /><TD /><TD /><TD /><TD /><TD /><TD /><TD /><TD>*sample</TD><TD>*sample</TD><TD>{D7BF5328-D123-DF11-AA31-001372F920BA}</TD><TD /><TD>UAE</TD><TD>QUO-01001-NBF5LW</TD><TD /><TD>0</TD><TD /><TD /><TD /><TD /><TD /><TD /><TD /><TD /><TD /><TD /><TD>$2,744.00</TD><TD>$2,744.00</TD><TD>$2,744.00</TD><TD>$0.00</TD><TD>F003</TD><TD /><TD /><TD /><TD /><TD /><TD /><TD /><TD /><TD /><TD>FISH! Sticks</TD><TD>$0.00</TD><TD>$825.00</TD><TD>1.00000</TD><TD>$825.00</TD><TD /><TD>$825.00</TD><TD /><TD>No</TD><TD /><TD>Ahmad Hussain</TD><TD /><TD>1</TD></TR></TABLE>

Feb 15, 2011

Credit Card Processor in Dynamics AX 2009 CRM:0027658

Credit Card Processor in Dynamics AX 2009

This post introduces the Credit Card processor functionality that is
available in Microsoft Dynamics AX 2009. There are two processors available
to users: Microsoft Dynamics Payment Services and Authorize.net. Depending
on your preference you can select which processor you want to process
payments, however only one can be active at a time. For this blog, we will
use Authorize.net. Continue reading for more information.

http://www.dynamicscare.com/blog/wp-content/uploads/2011/02/cc1.png

Basic Credit Card Process is below; It follows preauthorization of a Credit
Card as well.

Step 1. Click Area Page node: Accounts receivable -> Sales Order Details.

Form name: Sales orders

http://www.dynamicscare.com/blog/wp-content/uploads/2011/02/cc2.png

・ Create a new record in the Sales Order form clicking the 'New'
button.

Form name: Create sales order

http://www.dynamicscare.com/blog/wp-content/uploads/2011/02/cc3.png

Step 2. Fill in the necessary information to complete the Sales Order entry.


Step 3: The Sales order number is automatically generated

・ Ex: 'SO-00053177′

Step 4: Switch to the Lines tab on the Sales order and enter in Item
information.

http://www.dynamicscare.com/blog/wp-content/uploads/2011/02/cc4.png

Step 5: Switch to the Price/Discount tab on the Sales order.

Form name: Infolog

http://www.dynamicscare.com/blog/wp-content/uploads/2011/02/cc5.png

・ Click the Close button.

Make sure that the method of payment is set to Credit Card.

http://www.dynamicscare.com/blog/wp-content/uploads/2011/02/cc6.png

IF no credit card is on file or they want to charge a different card then
the Credit Card Wizard must be used to setup the Credit Card every time.
Follow the steps below to use the CC Wizard, otherwise skip to step 7 after
selecting the Credit Card to use.

Step 6: Click the Setup -> Credit Card Wizard menu button.

Form name: Credit Card Setup Wizard

http://www.dynamicscare.com/blog/wp-content/uploads/2011/02/cc7.png

・ Click the Next > button.

・ Switch to the Credit Card Wizard Action tab on the Credit Card Setup
Wizard form.

http://www.dynamicscare.com/blog/wp-content/uploads/2011/02/cc8.png

・ Click the Next > button.

・ Switch to the Credit card type tab on the Credit Card Setup Wizard
form.

http://www.dynamicscare.com/blog/wp-content/uploads/2011/02/cc9.png

・ Click the Next > button.

・ Switch to the Card holder tab on the Credit Card Setup Wizard form.

http://www.dynamicscare.com/blog/wp-content/uploads/2011/02/cc10.png

・ Change Card Holder Name

・ Click the Next > button.

・ Switch to the Contact information tab on the Credit Card Setup
Wizard form.

http://www.dynamicscare.com/blog/wp-content/uploads/2011/02/cc11.png

・ Input the necessary information into the fields.

・ Click the Next > button.

・ Switch to the Credit card number tab on the Credit Card Setup Wizard
form.

http://www.dynamicscare.com/blog/wp-content/uploads/2011/02/cc12.png

・ Input the credit card number and expiration date and click next to
finish the wizard.

Step 7: Click the Functions (b) -> Preauthorize menu button off of the Sales
Order header.

Form name: Infolog

http://www.dynamicscare.com/blog/wp-content/uploads/2011/02/cc131.png

・ The infolog tells you whether the transaction was successful for
not.

・ Click the Close button and continue if successful.

If unsuccessful, the infolog log will give a reason. Most likely, the Credit
Card was not setup correctly. Go back through the Credit Card wizard using
the Edit feature and verify all of the information. Try to preauthorize
again.

When you invoice the Sales Order the final authorization is sent through the
processor and the credit card is charged and settled with that amount on the
invoice.

Other Functionality with the Credit Card processor:

Credit Card Transaction History:

・ Click the Inquiries -> Credit card authorization history menu
button.

Form name: Credit card authorization history

http://www.dynamicscare.com/blog/wp-content/uploads/2011/02/cc14.png

・ Close the Credit card authorization history form.

----------------------------------------------------------------------------
----------------------------------------------------------------------------
---------------------------------------------

Faiqa Usman, Support Manager,